The optimal user experience is essential for having a modern and successful product. For this reason, we are pleased to announce that with VMWare Cloud Director Availability™ 4.1, we made some improvements to simplify and expedite the initial setup and configuration of the tool.
This post will review the differences in the initial configuration of VMware Cloud Director Availability 4.0 and 4.1, and describe the new activities in the process.
Architecture and port mapping
Contents
With regards to the architecture, there are no changes to what was part of VMware Cloud Director Availability 4.0. It is the same set of components – Cloud Replication Management Appliance, Cloud Replicator Appliance, and Cloud Tunnel Appliance. The communication between the different appliances occurs at the same ports as in 4.0 – please see Diagram 1.
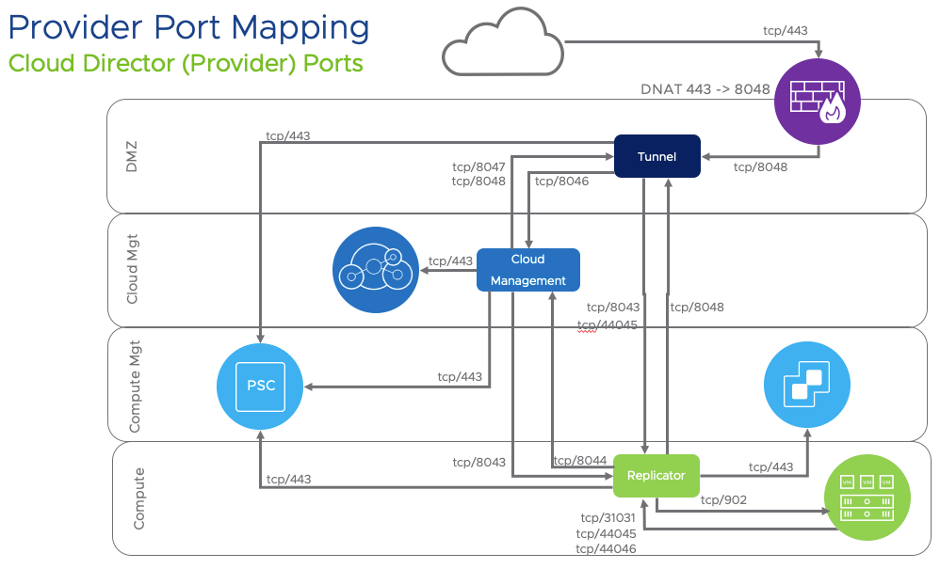
Diagram 1 – VMware Cloud Director Availability 4.1 Port mapping diagram
Requirements
Here is a high-level list of the requirements to deploy VMware Cloud Director Availability 4.1. For more details, please refer to the official documentation.
- DNS and NTP server
- SSO Lookup Service Address
- Routing and Firewall Ports in place – you can find the necessary ports in Diagram 1
- Compatible versions of vCenter and vCD – open the VMware Product Interoperability Matrices
VMware Cloud Director Availability 4.1 initial configuration – what’s new compared to 4.0
The deployment of the VMware Cloud Director Availability 4.1 appliances in the vCenter Server is done by following the same steps known from 4.0:
- Select the OVF template.
- Name the virtual machine.
- Select a destination compute resource.
- Review the virtual machine details.
- Read and accept the license agreement.
- Select the appliance that we are going to deploy.
- Pick the storage for the disk files.
- Specify the network.
- Enter the deployment properties such as root password, NTP server, IP address, gateway, DNS, and more.
- Validate that all the details are correctly entered on the summary screen, and deploy the virtual machine.
The new things (or changes/improvements) in vCDA 4.1 (can be seen) appear after the Cloud Replication Management Appliance, Cloud Replicator Appliance, and Cloud Tunnel Appliance are in place and started.
It is the initial setup wizard that replaces the Installation Checklist that we used during the 4.0 setup.
It is designed to guide you through the essential steps to configure all the appliances at the same time, no matter if it is a combined or a distributed environment (only the distributed setup is recommended for production).
For example, you can define the Lookup service, attach a Cloud Replicator Appliance or a Cloud Tunnel Appliance, and even change the root password for of all appliances, eliminating the necessity to log in to each of them and change it in their UI.
A detailed look at the initial setup wizard
Watch the detailed video
After you successfully deploy the OVA templates for all the appliances, the next step is to run the brand-new initial setup wizard.
First, you need to login to the appliance by opening your browser and entering the following URL: https://<Cloud-Replication-Management-Appliance-URL>/ui/admin.
You will see the login screen of the VMware Cloud Director Availability 4.1 Cloud Service admin UI. There, you have to enter the password defined during the deployment process.
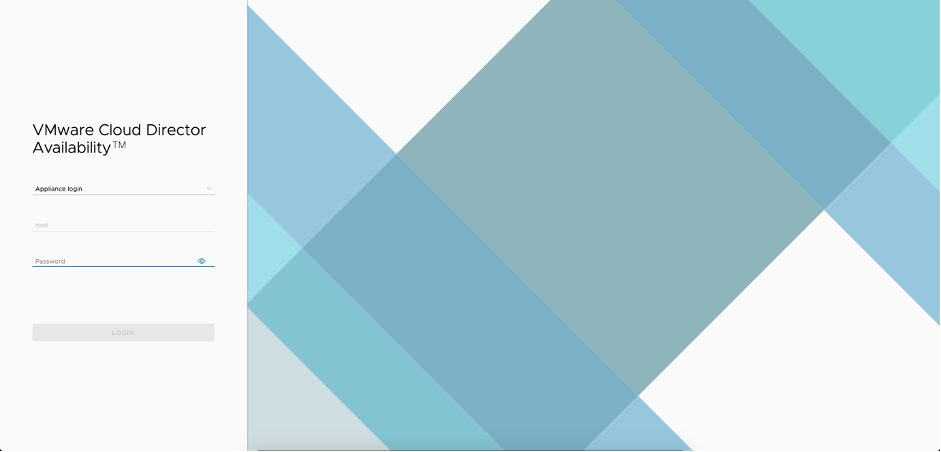
Picture 2 – VMware Cloud Director Availability login screen
Since it is the first login to the system, you will be prompted to change the password.
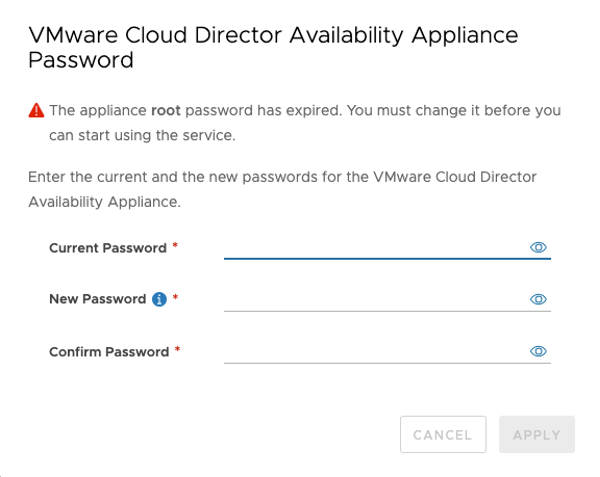
Picture 3 – Change the appliance root password
After you enter a new password that matches the password policy (it should be at least 8 symbols and contain at least one uppercase, lowercase, number, and special character), you will see the welcome screen (Picture 4).
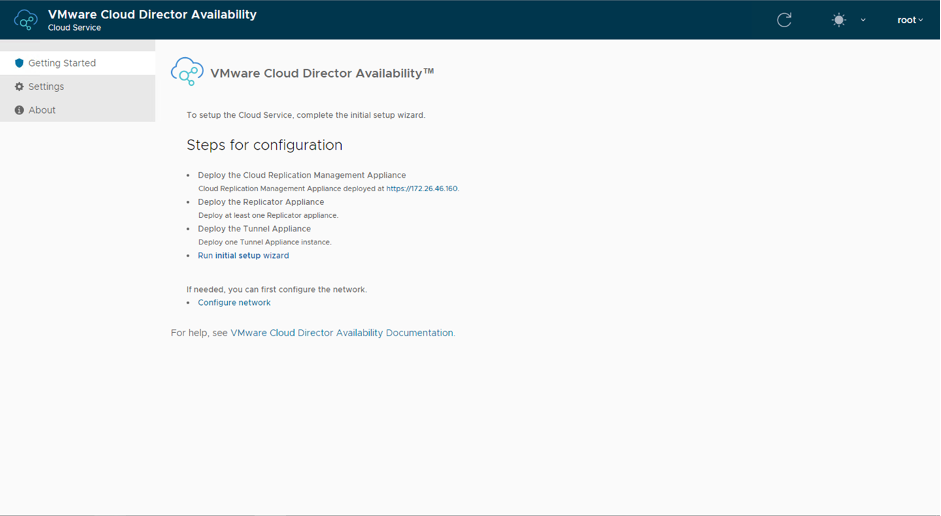
Picture 4 – VMware Cloud Director Availability initial wizard screen
After reading and complying with the information on the welcome screen, proceed with the configuration of the Cloud Director Availability, by clicking Run Initial Setup Wizard. Note that all the steps are mandatory, and you cannot skip any of them.
The first thing to do is to enter your license key.
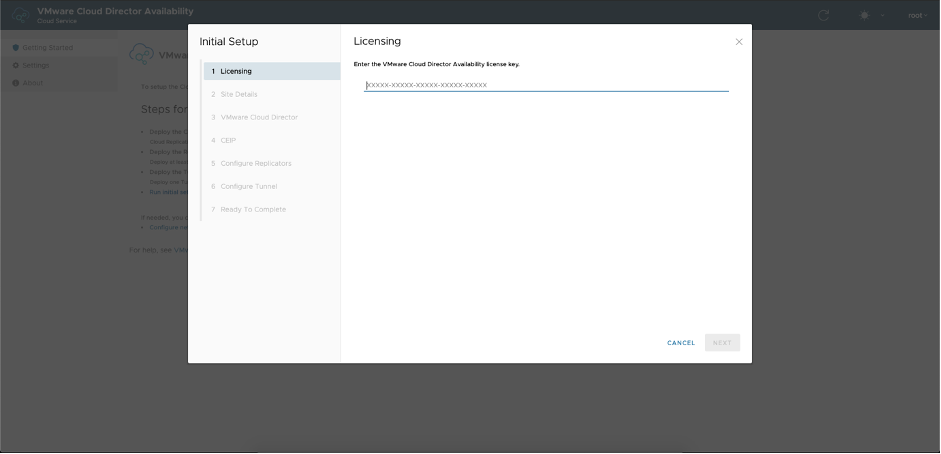
Picture 5 – Step 1 – enter the license key
Next, you need to give your site a name and provide the Service Endpoint address. In case you are not sure about the address at the moment of setup, you can leave it empty and fill it later in the VMware Cloud Director Availability portal (Configuration menu).
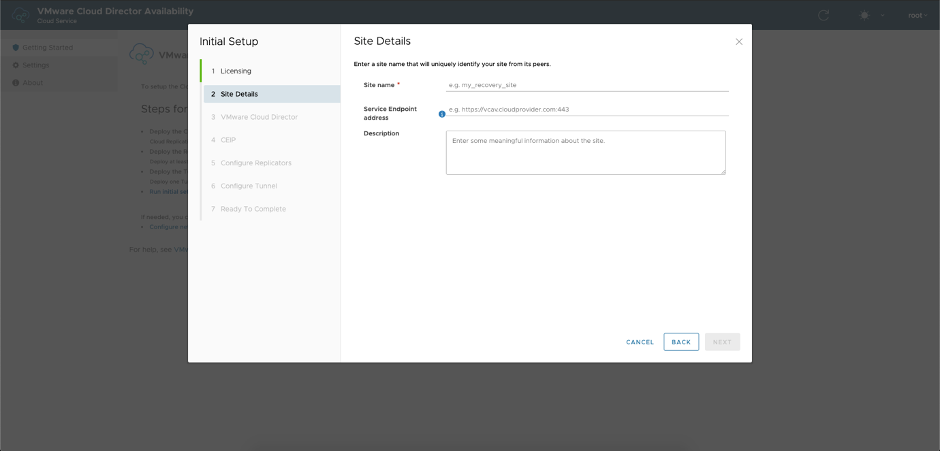
Picture 6 – Step 2 – Site details
On the next screen, you have to fill in your VMware Cloud Director Endpoint address and an administrator’s credentials. Note that you only need to type the Endpoint URL, and the wizard will automatically add the https:// prefix and /api suffix.
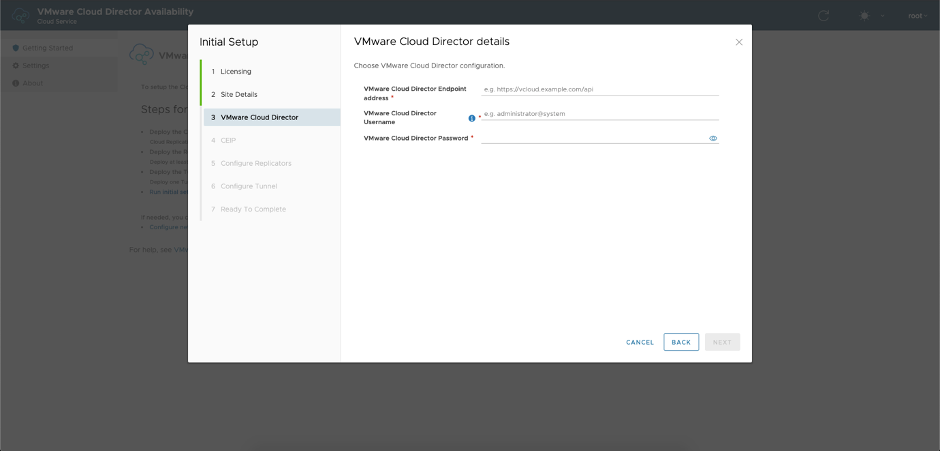
Picture 7 – Step 3 – VMware Cloud Director™ Details
By clicking Next, you are prompted to reject or accept the VMware Cloud Director certificate. To proceed further, you need to accept it.
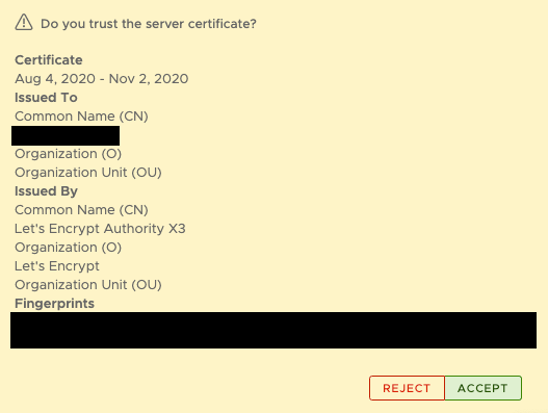
Picture 8 – Accepting the certificate of the VMware Cloud Director
After accepting the certificate, you will be asked for your consent to participate in the VMware’s Customer Experience Improvement Program (“CEIP”). By default, it is checked, but you can uncheck it and proceed with the wizard.
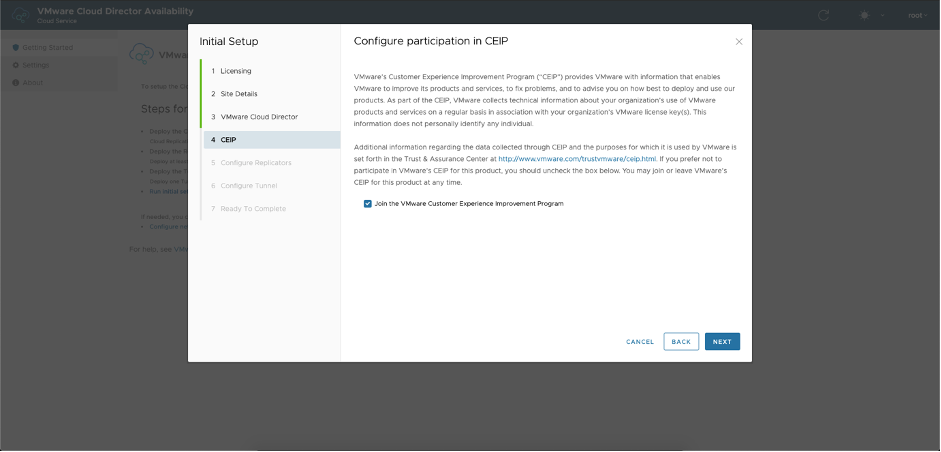
Picture 9 – Step 4 – Participation in the VMware’s Customer Experience Improvement Program
The penultimate step is to connect your Cloud Replicator Appliance(s) (if you have more than one). An important note – on this step, you enter the Lookup Service Address. It is used for all your replicators and the tunnel.
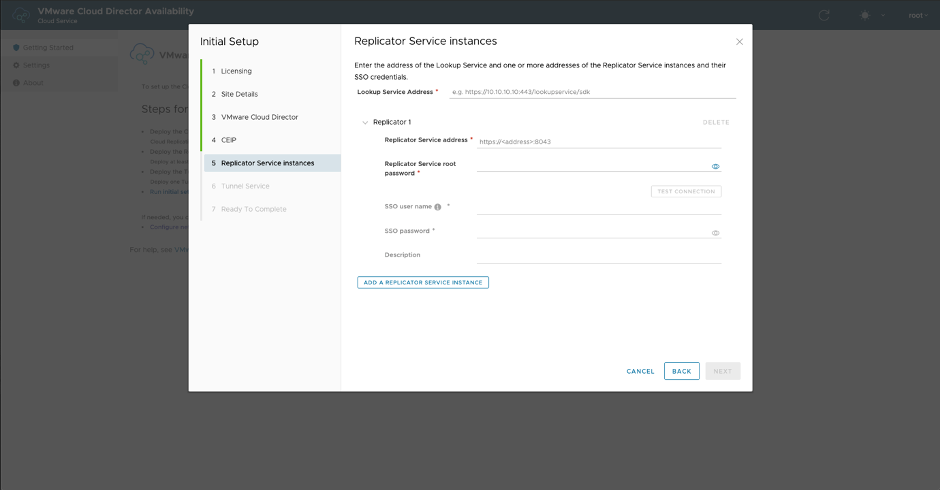
Picture 10 – Step 5 – Configure the Cloud Replicator Appliance(s)
After entering all the Lookup Service Address, Replicator Service Address, and root password, you need to click TEST CONNECTION to verify the connectivity and connect to the Cloud Replicator Appliance. Similarly, to the VMware Cloud Director Service Endpoint, you only need to put the IP/URL, and the port, prefix, and suffix are added automatically. You need to perform the same set of actions for all the Cloud Replicator Appliances you want to attach.
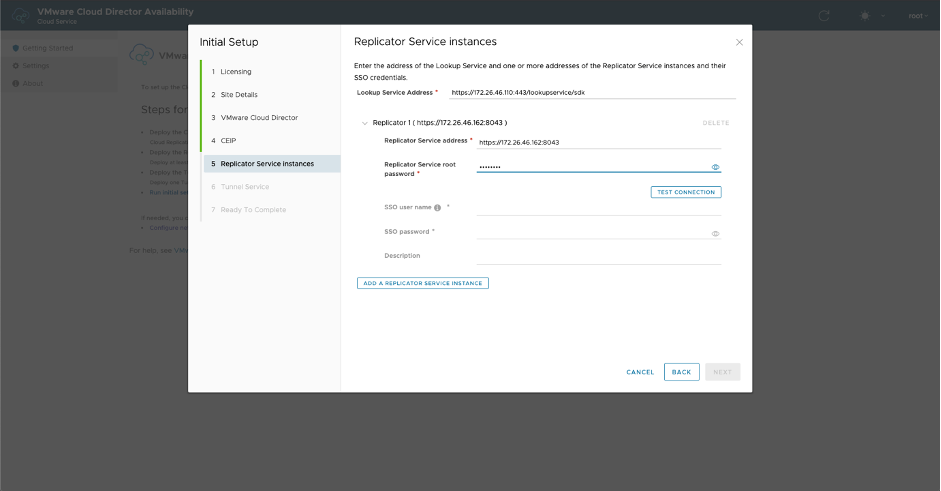
Picture 11 – Submit the Cloud Replicator Appliance details
Right after clicking the TEST CONNECTION button, you will be prompted to reject or accept the Cloud Replicator Appliance certificate. To proceed, accept the certificate.
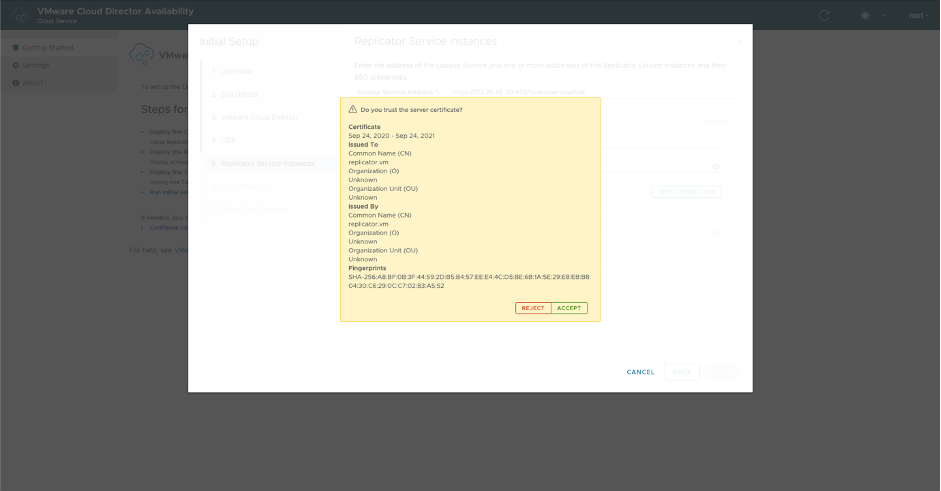
Picture 12 – Accept the certificate of the Cloud Replicator Appliance
If you haven’t logged in the Cloud Replicator Appliance UI so far, you will see a message that the root password has expired. You can directly set a new root password from the wizard. The password policy is the same as for the Cloud Replication Management Appliance. If you change the password before running the wizard, you will proceed directly to the last step without being asked to change the root password.
You also need to provide the SSO administrator credentials.
The ADD A REPLICATOR SERVICE INSTANCE button will let you connect additional Replicator Services if wanted.
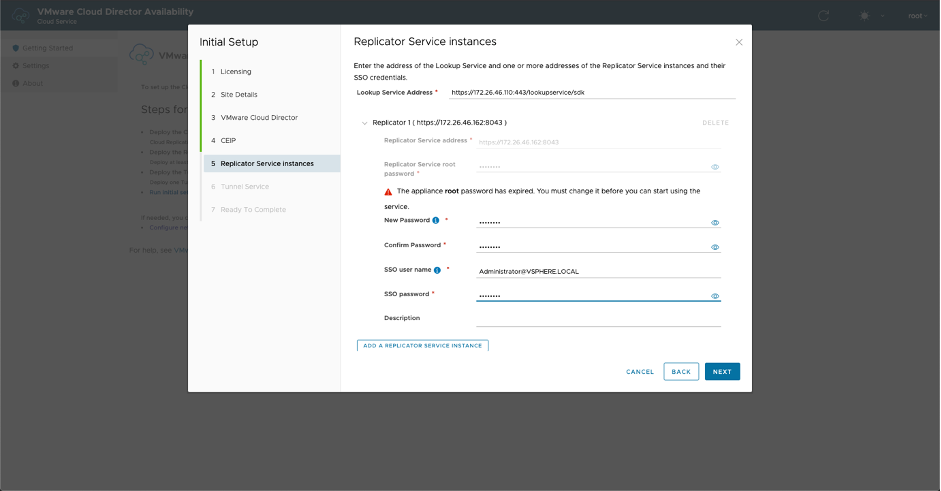
Picture 13 – Change the root password of the Cloud Replicator Appliance
If all the details are entered correctly, you will be prompted to reject or accept the Lookup Service certificate. To proceed, accept the certificate.
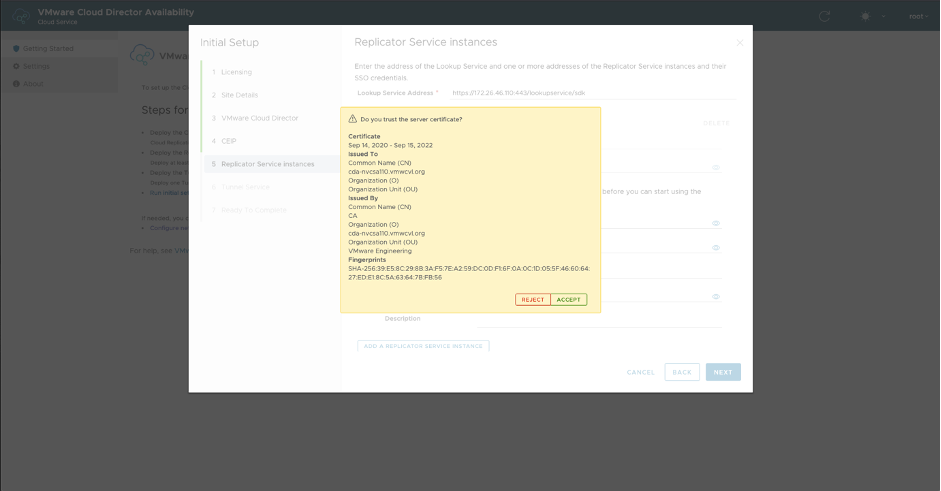
Picture 14 – Accept the certificate of the Cloud Replicator Appliance
The very last step of the setup process is to connect to the Cloud Tunnel Appliance. You don’t need to define the Lookup Service Address again as the wizard uses the one set on the previous step. You only need to enter the API URL and the root password. Note that the prefix and port are added automatically.
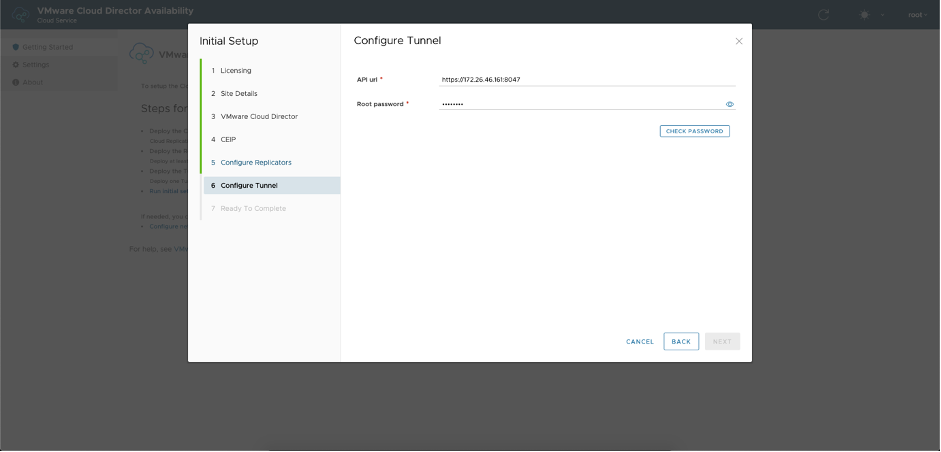
Picture 15 – Step 6 – Configure the Cloud Tunnel Appliance
Similarly, to the previous step where we connected to the Cloud Replicator Appliance(s), if you haven’t changed the root password yet, you could do it after clicking the CHECK PASSWORD button. Note that if you have already changed the password, the UI will direct you to the next action.
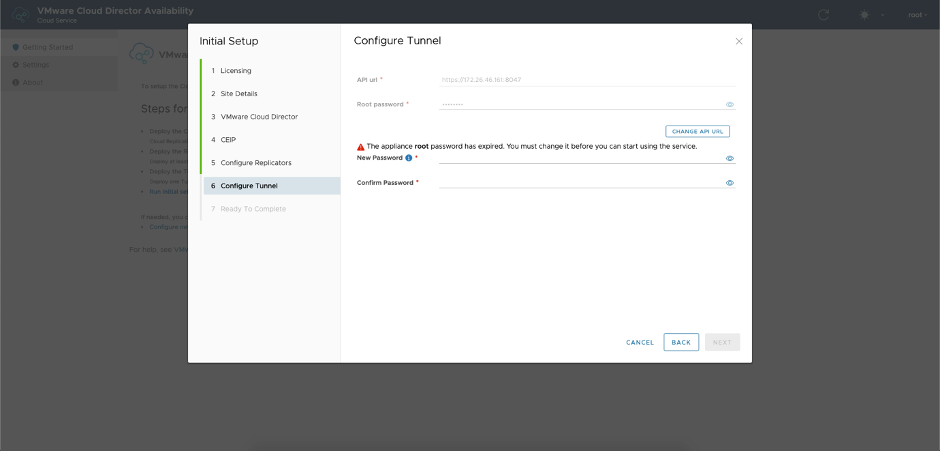
Picture 16 – Change the root password of the Cloud Tunnel Appliance
By clicking Next, you will be prompted to reject or accept the Cloud Tunnel Appliance certificate. To go through, you need to accept it.
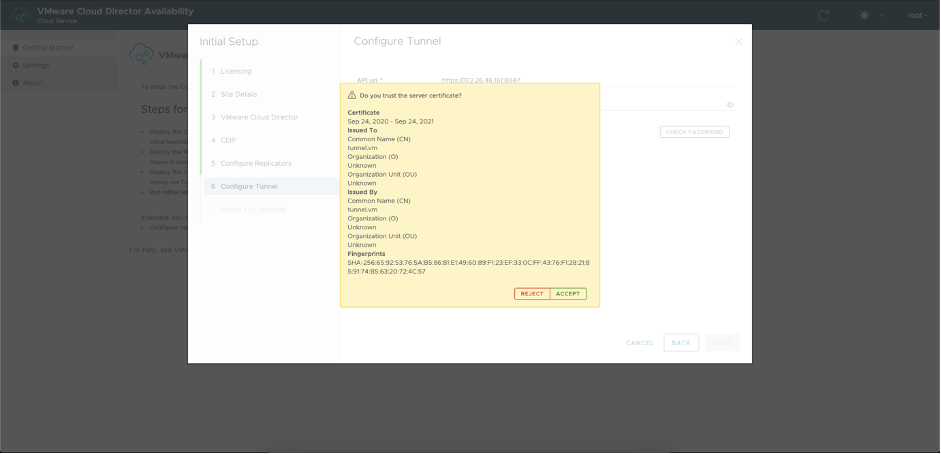
Picture 17 – Accept the certificate of the Cloud Tunnel Appliance
The last stage of the wizard is a summary that will show you some of the details you entered. Use the Finish button to close the initial setup wizard and start using your newly configured VMware Cloud Director Availability 4.1.
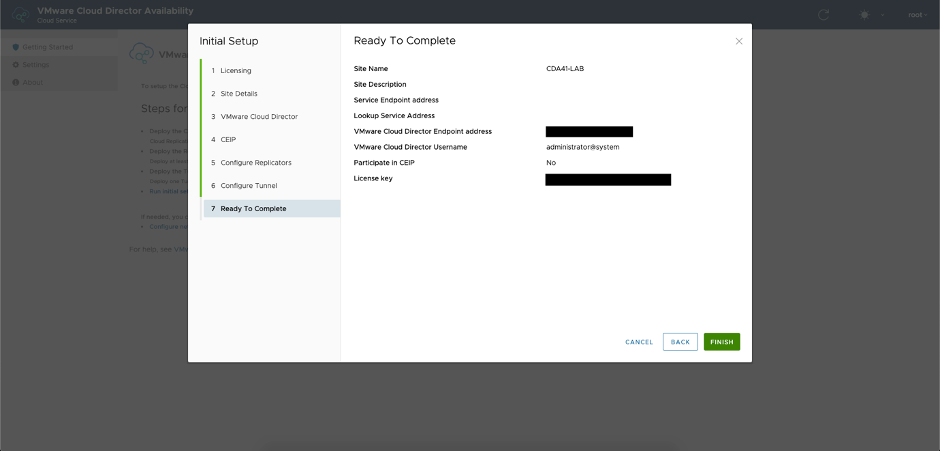
Picture 18 – Step 7 – Summary
On Picture 19, you can see how the home screen looks like after performing a successful configuration.
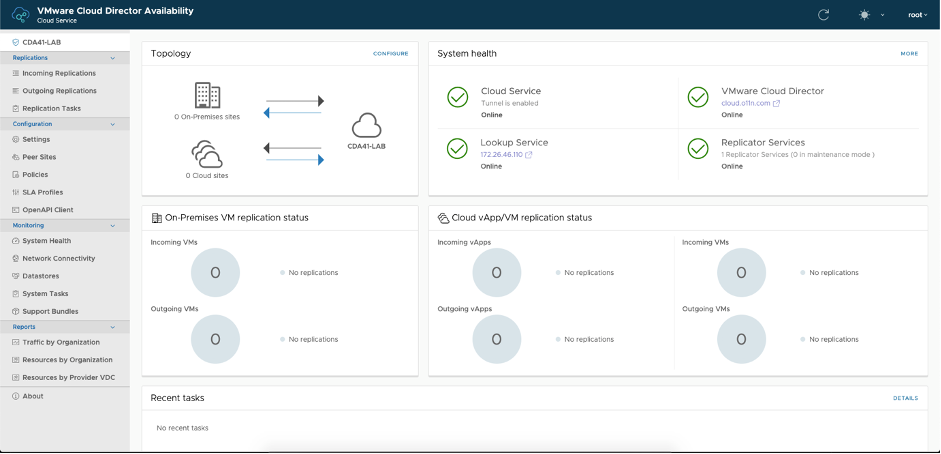
Picture 19 – VMware Cloud Director Availability home screen
Summary
The few extra steps in the initial setup wizard grant a more straightforward configuration process done in a single place. There is no need to jump between different UIs, change passwords, and even follow a checklist – it is all in the wizard now!
To learn more about the other new features of VMware Cloud Director Availability, please check our release blog.


