I have mostly been a sucker for bootable USB Stick. I find they come in handy for fixing partitions, recovering data and even virus scanning. They tend to be very useful for Windows Systems which are not recovering properly, which rarely happens (I am of course kidding).
I find that Linux helps save the day for these Windows Systems. I have to admit that I still use one Windows laptop on occasion.
To start you need to download the Ventoy program.
Downloading
You can start by going to www.ventoy.net to see any documentation or other information you may want to read. You can click on Downloads or go directly to https://www.ventoy.net/en/download.html. On the ‘Downloads’ page you can click on the preferred download version.
Once you click on the desired file you should then be directed to the Github site, specifically to https://github.com/ventoy/Ventoy/releases. If you scroll down there should be a subsection called ‘Assets’. Under ‘Assets’ should be listed the various downloads of the current version. The listed files should be for Linux, Windows, Source for Linux and Source for Windows. Choose your file and once clicked it should open another page that should download the proper file. Extract the files from the compressed file you downloaded.
Open a Terminal into the extracted folder. From a Terminal prompt, you can type the command ‘sudo ./Ventoy2Disk.sh -i /dev/sdx’, where ‘sdx’ is replaced by the location of the USB Stick to which you want to erase and install Ventoy.
An example output is shown in Figure 1.
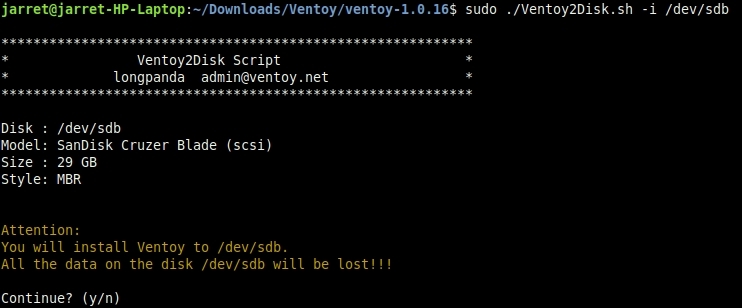
FIGURE 1
After clicking ‘y’ you will be prompted to verify that you do want to delete all of the data on the given drive. Click ‘y’ if you want to proceed or ‘n’ to stop. If you proceed then the USB Stick will be prepared for Ventoy. The process is shown in Figure 2.
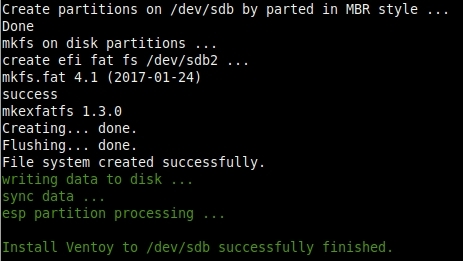
FIGURE 2
By default, the USB Stick will be made with a Master Boot Record (MBR). To use a GUID Partition Table (GPT) you can include the ‘-g’ parameter when installing Ventoy. If you need Secure Boot then use the ‘-s’ parameter when running the script. If you want to completely overwrite the USB device and start over then use the ‘-I’ parameter.
Once the script is completed you should see that the USB Stick label should be ‘Ventoy’.
NOTE: If a new version of Ventoy is downloaded, you can run it the same way and the program will detect that the USB Stick is already a Ventoy drive. Once detected, you will be prompted to update the Ventoy files on the USB Stick. Any files already on the device will not be erased or changed.
Once the Ventoy install is completed then you only need to copy ISO files to the USB Stick.
There should be two partitions created. The smaller partition will contain the boot file needed by Ventoy and the main partition is for the ISO files. The smaller partition should be about 32 MB and formatted as FAT16. The remaining space, used for the ISO files, is formatted as exFAT by default. You can reformat the partition with one of the following: exFAT, FAT32, NTFS, UDF, XFS, Ext2, Ext3, Ext4.
By default 0 GB of unformatted space is left at the end of the USB Stick. You can format this space and use it as needed. If you want to reserve more space then you can use the ‘-r MB’ parameter, where MB is replaced with the size in MB to be reserved.
The ISO files which are compatible with Ventoy are as follows:
- Debian
- Ubuntu
- CentOS
- RHEL
- Deepin
- Fedora
- SLES
- openSUSE
- MX Linux
- Manjaro
- Linux Mint
- Elementary OS
- Solus
- Linx
- Zorin
- antiX
- PclinuxOS
- Arch
- ArcoLinux
- ArchLabs
- BackArch
- Obarun
- Artix Linux
- Puppy Linux
- Tails
- Slax
- Kali
- Mageia
- Slackware
- Q4OS
- Archman
- Gentoo
- Pentoo
- NixOS
- Ubuntu Kylin
- Lubuntu
- Xubuntu
- Kubuntu
- Ubuntu MATE
- Ubuntu Budgie
- Ubuntu Studio
- Bluestar
- OpenMandriva
- ExTiX
- Netrunner
- ALT Linux
- Nitrux
- Peppermint
- KDE neon
- Linux Lite
- Parrot OS
- Qubes
- Pop OS
- ROSA
- Void Linux
- Star Linux
- EndeavourOS
- MakuluLinux
- Voyager
- Feren
- ArchBang
- LXLE
- Knoppix
- Robolinux
- Calculate Linux
- Clear Linux
- Pure OS
- Oracle Linux
- Trident
- Septor
- Porteus
- Devuan
- GoboLinux
- 4MLinux
- Simplicity Linux
- Zeroshell
- Android-x86
- netboot.xyz
- Slitaz
- SuperGrub2Disk
- Proxmox VE
- Kaspersky Rescue
- SystemRescueCD
- MemTest86
- MiniTool Partition Wizard
- Parted Magic
- veket
- Sabayon
- Scientific
- alpine
- ClearOS
- CloneZilla
- Berry Linux
- Trisquel
- Ataraxia Linux
- Minimal Linux Live
- BackBox Linux
- Emmabuntüs
- ESET SysRescue Live
- Nova Linux
- AV Linux
- RoboLinux
- NuTyX
- IPFire
- SELKS
- Zstack
- Enso Linux
- Security Onion
- Network Security Toolkit
- Absolute Linux
- TinyCore
- Springdale Linux
- Frost Linux
- Shark Linux
- LinuxFX
- Snail Linux
- Astra Linux
- Namib Linux
- Resilient Linux
- Virage Linux
- Blackweb Security OS
- R-DriveImage
- O-O.DiskImage
- Macrium
- ToOpPy LINUX
- GNU Guix
- YunoHost
- foxclone
- Adelie Linux
- Elive
- PardusCDlinux
- AcademiX
- Zenwalk
- Anarchy
- DuZeru
- BigLinux
- OpenMediaVault
- Ubuntu DP
- Exe GNU/Linux
- 3CX Phone System
- KANOTIX
- Grml
- Karoshi
- PrimTux
- ArchStrike
- CAELinux
- Refracta
- Cucumber
- Fatdog
- ForLEx
- Hanthana
- Kwort
- MiniNo
- Redcore
- Runtu
- Asianux
- Clu Linux Live
- Uruk
- OB2D
- BlueOnyx
- Finnix
- HamoniKR
- Parabola
- LinHES
- LinuxConsole
- BEE free
- Untangle
- Pearl
- Thinstation
- TurnKey
- tuxtrans
- Neptune
- HefftorLinux
- GeckoLinux
- Mabox Linux
- Zentyal
- Maui
- Reborn OS
- SereneLinux
- SkyWave Linux
- Kaisen Linux
- Regata OS
- TROM-Jaro
- DRBL Linux
- Chalet OS
- Chapeau
- Desa OS
- BlankOn
- OpenMamba
- Frugalware
- Kibojoe Linux
- Revenge OS
- Tsurugi Linux
- Drauger OS
- Hash Linux
- gNewSense
- Ikki Boot
- Acronis
- Active.Boot
- AOMEI
- Boot.Repair
- CAINEDaRT
- EasyUEFI
- R-Drive
All you have to do is download any ISO image you want which is supported and also contains a LIVE image.
If you should use the Secure parameter (-s) for creating a bootable USB Stick then be prepared for an error message. The error message will only occur once per machine. As long as you go through these steps, you will be fine:
- Select ‘OK’ at the initial error screen
- Press any key to perform MOK Management
- Select ‘Enroll key from disk’ and press Enter
- Select EFI and press Enter
- Arrow down to ‘Enroll this key in manager.cer’ then press Enter
- Select ‘Continue’
- Select ‘Yes’
- Select ‘Reboot’ then click Enter
- After the system reboots, start system to boot from USB and select the desired menu entry
You can fill the USB Stick up with as many ISO files as you require. Keep in mind that any changes made to the image will not be persistent. That is, the changes will be lost when the system is rebooted.
To add persistence you can return to the Ventoy folder and run the command CreatePersistentImg.sh. The default size is 1 GB. You can change it by using the ‘-s’ parameter followed by the persistence partition size in KB. For example, to generate a partition with a size of 2 GB the parameter would be ‘-s 2048’. The default format is EXT4. The other formats are ext2/ext3/ext4/xfs. To specify a different format use the ‘-t’ parameter followed by the format type. For example, to use a format of ‘xfs’ use the parameter ‘-t xfs’.
When you boot from the USB Stick you will be prompted to boot with persistence or without.
Conclusion
I have found Ventoy to be very easy and useful. My article to Multi-boot with full persistence (https://linux.org/threads/multi-boot-full-install-to-a-usb.23563/) can take some time and a little know-how.
If you require a USB Boot Stick then you may want to try this one out.

