With any Operating System (OS) the processes being run on a system have priorities. One process will be granted a higher priority than other processes and so will get more of the CPU time. Tasks with higher priorities can complete faster than others or compete faster than normal.
For example, if you have a server with a specific task running that needs to complete sooner than normal then you can give the task more CPU time. Each process on a Linux system by a user has the same priority. Some system processes will have a higher priority than any other tasks and these should not be changed. Changing system priorities can cause a Linux system to slow down and not function well.
Priorities
On a Linux system there are System Priorities and User Priorities. The System Priorities can be set by Root or are set as the OS loads. The User Priorities are set by a user for the tasks they create.
System Priorities are numbers between -20 to 19. The lower the number the more CPU Time the process receives. User Priorities are between 60 to 99. Again, the lower the value the more CPU Time the task is given.
By default, the User Priority is 80 and the System Priority is 0.
So you can see that the System Priorities, services and the like, have a much higher priority than tasks set by the users.
NOTE: Be careful that you do not give unnecessary tasks a System Priority or the whole system can slow down.
Foreground and Background
Foreground and background processes, by default, will have the same priority. The difference between them is that a process in the foreground is one that is actively being viewed. Background processes are those which are minimized. Be aware that when you minimize all applications then the desktop is visible. The Desktop is running in a System Priority and needs to remain so.
You can run tasks in a Terminal in the background and foreground. By default, any tasks are in the foreground. To start a task in the background you need to add an ampersand (&) after the command. Be aware that any command which gives a visual output will still do so even if it is in the background. For example, You could run the command ‘ping 8.8.8.8&’. The command is in the background, but you still see the individual results of each ping sent to the target system. Since it is in the background, you can issue another command such as ‘ping 8.8.4.4&’. This will place another ping command in the background and every other line will be a different target as shown in Figure 1.
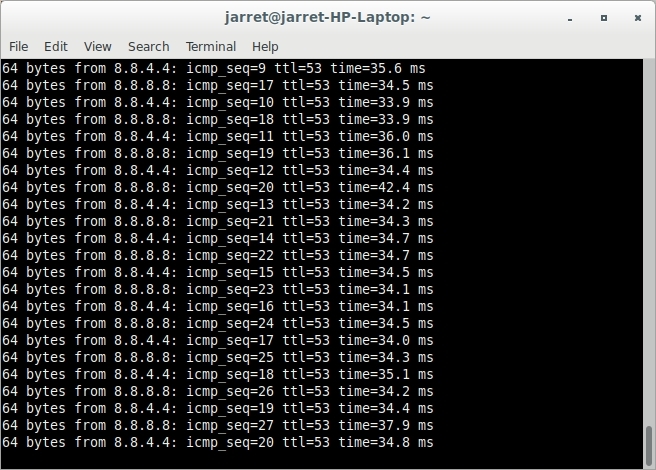
FIGURE 1
To move a process to the foreground you can use the ‘fg’ command. The last process which has the focus is the default process if none is specified. Let’s try an example here.
In a Terminal you need to run the command ‘ping 8.8.8.8’. The command will not be in the background yet. After the individual pings start appearing you need to press CTRL-Z to suspend the process. Keep in mind that CTRL-Z suspends a process in the foreground and CTRL-C kills the foreground process. After the task is suspended you need to execute the command ‘jobs’ as shown in Figure 2.
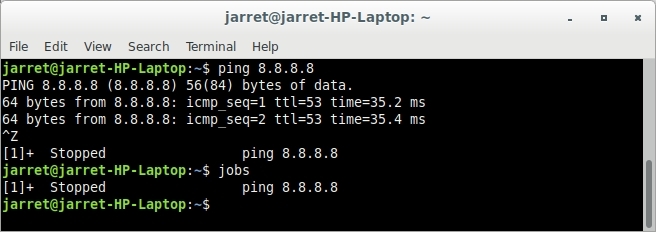
FIGURE 2
At the beginning of the line for the ‘jobs’ output you see there is a ‘[1]+’. The plus (+) denotes that the task is the default task. The task can also be referred to as ‘1’. You can run numerous ping commands and suspend them. The last command executed is the default. The first command executed is still number ‘1’ and the later commands are numbered consecutively.
So, let’s try another command in the same Terminal. Execute ‘ping 8.8.4.4’ and let a few pings appear before you press CTRL-Z. The output will be similar to Figure 3.
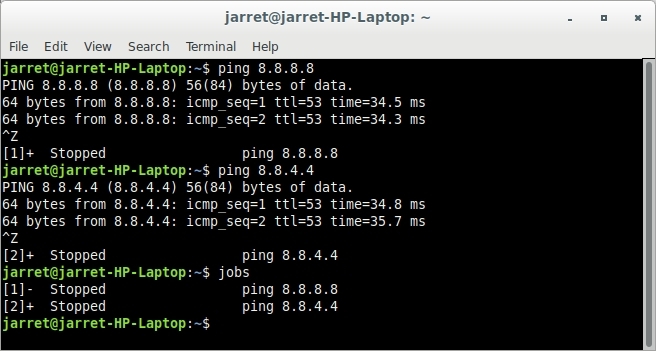
FIGURE 3
If you bring one of the processes to the foreground (fg) then it will start running again. If you use the command ‘fg’ then the default will be started in the foreground. In this case the default is Job 2 or ‘ping 8.8.4.4’. If you wanted Job 1 to start in the foreground you could execute the command ‘fg 1’.
To send a job to the background you use the ‘bg’ command. It works in the same manner as the ‘fg’ command. You can issue no job number and the default is used or you can issue a number for a specific job.
NOTE: Keep in mind that the default job is the last one that was in the foreground. If you start a job directly in the background with the ampersand (&) then it will not be the default.
Let’s try something a little different. Let’s start a process in the background. We can ping another Root DNS Server with the command ‘ping 198.41.0.4&’ If you wanted you could also place a space before the ampersand (&). Since the process is set to be started in the background the first thing is for the Process ID (PID) to be listed. Even in the background the individual pings will be displayed on the screen. Since the process is in the background, you can issue other commands in the foreground. You can type ‘fg 3’ to bring the new command to the foreground. Press CTRL-Z to pause the process. In Figure 4 you can see where I performed these steps. The initial ping command was given to be put in the background. The PID was returned as ‘19466’. The first ping package is reported and I entered the command ‘fg 3’ which was placed on two different lines. The command may be displayed over multiple lines, but it is issued in the foreground and accepted as a full command. Now the process is in the foreground and another ICMP receipt for the ping command is displayed. I then pressed CTRL-Z to suspend the process.
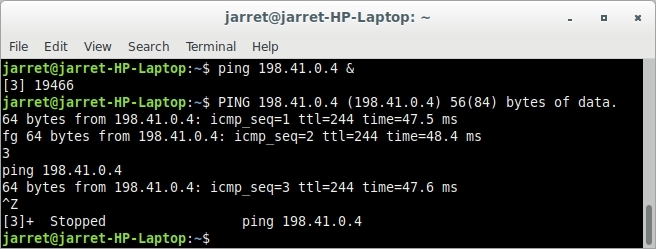
FIGURE 4
If I were to run ‘jobs’ then the default job is now 3 since it had been in the foreground. If the job were in the background or suspended it can be killed.
Killing a Process
Since we know the PID of the last command, it can be killed with the command ‘kill -kill 19466’. We can kill the process with the Job ID as well. You need to precede the Job number with a percent (%). So, to kill Job 1 the command is ‘kill -kill %1’.
NOTE: Know that when you kill a lower number job, the higher numbered jobs are not changed, but stay the same.
If I have three jobs and delete Job 2 I will be left with Job 1 and 3. If I add another job I will then have Jobs 1, 2 and 4.
The default job can be deleted by its number or using the command ‘kill -kill %%’.
Using the command ‘jobs’ you can see that the process has been killed or its state. Whether ‘stopped’ or ‘running’, a job has a priority which can be set or changed from the default.
Setting Priorities
I covered the default priorities at the beginning of this article and now we will look at changing the priority of a process.
Within a Terminal shell processes are executed and exist within the shell. If you open a second Terminal and run ‘jobs’ you will see only the jobs started in that Terminal.
To see more information about the processes you can execute the command ‘ps -l’ (it is a lower-case L). The results are shown in Figure 5.

FIGURE 5
Here, you can see five processes. The first is ‘bash’ which is the Terminal itself. The next three processes are the three ‘ping’ commands. The last command is the ‘ps’ command used to display the Process Status. There are two columns of importance for the priorities. The first is the column labeled ‘PRI’ which is the Priority value. The second important column is ‘NI’ for the NICE value.
The priorities are all at the default of 80 and the Nice value is the default of 0.
The way to change individual process priorities is by using the Nice value. The Nice values can range from -20 to 19. The value changes the Priority from the base of 80. Nice value of -20 will move the Priority to 60 while a value of 19 will move it to 99.
NOTE: To use a negative value for Nice requires you to use ‘sudo’. If you do use ‘sudo’ then the process will not be in the user process list. To see that process you must look in the root process list (sudo ps -l).
For example, to set a Priority of 99 instead of 80 you could use the command ‘nice -n 19 8.8.8.8’ as shown in Figure 6.

FIGURE 6
You can see the Priority is 99 and Nice is 19. The process will get less CPU time than those at the default value. For a Ping command the change will not cause any difference unless a more CPU intensive process is started.
Once a process is started you can change the value by using the ‘renice’ command.
NOTE: It is very important to remember that ‘sudo’ is required for ‘renice’ since you are changing a running process.
From the previous example we can reset the Nice value. If the value is set to ‘5’ then the priority is reset to ‘80’ and the Nice value of ‘5’ is added to make the final Priority to ‘85’. The command is ‘sudo renice -n 5 -p 29947’. The ‘p’, or Processor ID, can be found from the ‘ps -l’ command. If you need to change the Priority of a process outside of the Terminal you can get the Process ID from the ‘top’ command.
I hope this article helps you understand more about process priorities and how to manipulate them.


![Backup and Restore VMs with Proxmox [Proxmox Series #5]](https://linuxpunx.com/wp-content/uploads/2023/08/backup-and-restore-vms-with-proxmox-proxmox-series-5-11-768x432.png)