vi /etc/hosts
[root@node1 ~]# pcs status
Make a host entry about each node on all nodes. The cluster will be using the hostname to communicate with each other.
Environment
Contents
/usr/sbin/httpd -f /etc/httpd/conf/httpd.conf -c "PidFile /var/run/httpd.pid" -k graceful > /dev/null 2>/dev/null || true
fdisk -l | grep -i sd
subscription-manager repos --enable=rhel-8-for-x86_64-highavailability-rpms
In my nodes, /dev/sdb is the shared disk from iSCSI storage.
pcs resource restart <resource_name>
[root@storage ~]# fdisk -l | grep -i sd
Reference: Red Hat Documentation.
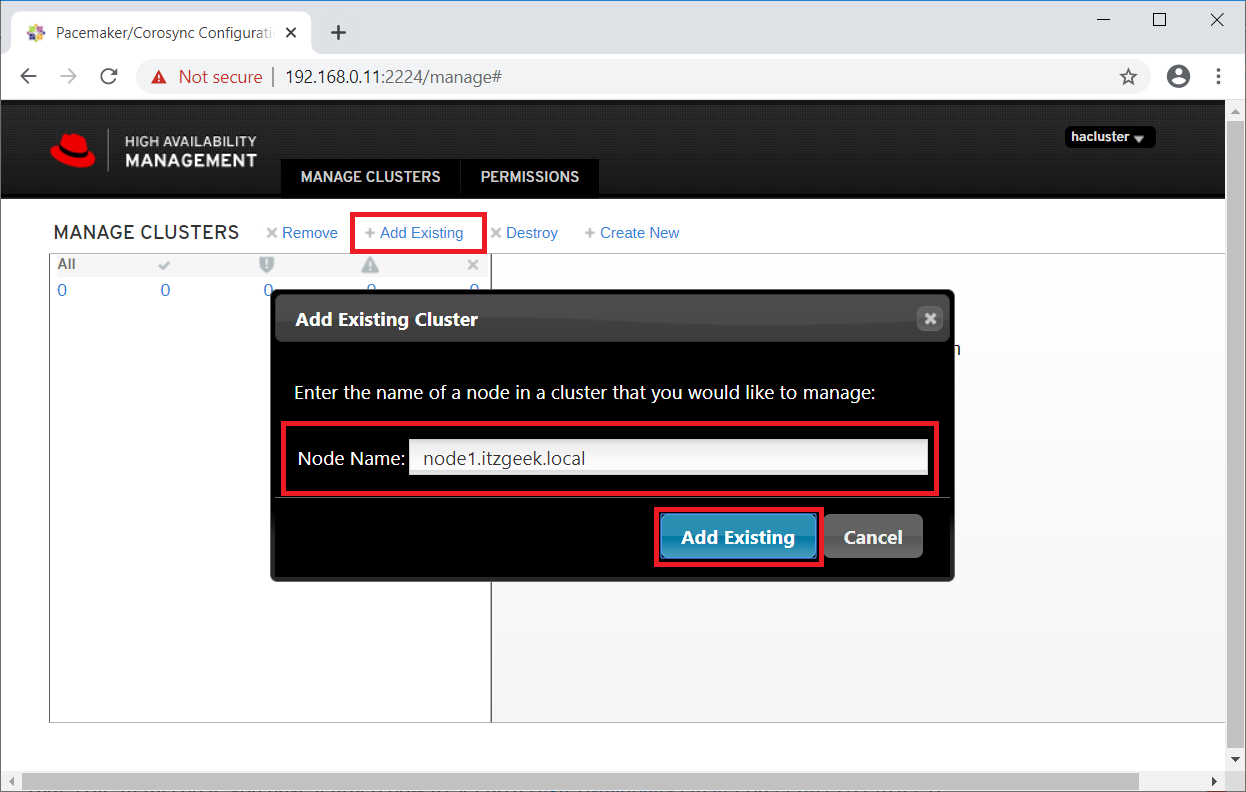
Enter any one of a cluster node to detect an existing cluster.
Shared storage is one of the critical resources in the high availability cluster as it stores the data of a running application. All the nodes in a cluster will have access to the shared storage for the latest data.
Here, we will create an LVM on the iSCSI server to use as shared storage for our cluster nodes.
[root@node2 ~]# lvdisplay /dev/vg_apache/lv_apache
<Location /server-status> SetHandler server-status Require local

</Location>
[root@storage ~]# pvcreate /dev/sdb [root@storage ~]# vgcreate vg_iscsi /dev/sdb [root@storage ~]# lvcreate -l 100%FREE -n lv_iscsi vg_iscsi
[root@node1 ~]# pcs status
dnf config-manager --set-enabled HighAvailability
RHEL 8
[root@storage ~]# dnf install -y targetcli lvm2
Cluster Nodes
[root@storage ~]# firewall-cmd --permanent --add-port=3260/tcp [root@storage ~]# firewall-cmd --reload
High Availability cluster, also known as failover cluster or active-passive cluster, is one of the most widely used cluster types in a production environment to have continuous availability of services even one of the cluster nodes fails.
iscsiadm -m node -T iqn.2003-01.org.linux-iscsi.storage.x8664:sn.eac9425e5e18 -p 192.168.0.20 -l
SAN storage is the widely used shared storage in a production environment. Due to resource constraints, for this demo, we will configure a cluster with iSCSI storage for a demonstration purpose.
[root@node1 ~]# pcs cluster status
That’s All. In this post, you have learned how to set up a High-Availability cluster on CentOS 8 / RHEL 8.
Since we already have a cluster, click on Add Existing to add the existing Pacemaker cluster. In case you want to set up a new cluster, you can read the official documentation.
Here, we will configure a failover cluster with Pacemaker to make the Apache (web) server as a highly available application.
firewall-cmd --permanent --add-service=high-availability firewall-cmd --add-service=high-availability firewall-cmd --reload
[root@node1 ~]# pcs cluster enable --all
passwd hacluster
iscsiadm -m discovery -t st -p 192.168.0.20
pcs cluster start --all
Failover is not just restarting an application; it is a series of operations associated with it, like mounting filesystems, configuring networks, and starting dependent applications.
In a minute or two, you would see your existing cluster in the web UI.
[root@node1 ~]# mount /dev/vg_apache/lv_apache /var/www/ [root@node1 ~]# mkdir /var/www/html [root@node1 ~]# mkdir /var/www/cgi-bin [root@node1 ~]# mkdir /var/www/error [root@node1 ~]# restorecon -R /var/www [root@node1 ~]# cat <<-END >/var/www/html/index.html Select the cluster to know more about the cluster information.
<html>
<body>Hello, Welcome!. This Page Is Served By Red Hat Hight Availability Cluster</body>
</html>
END [root@node1 ~]# umount /var/www
pcs cluster destroy <cluster_name>
Cluster Web User Interface
[root@node1 ~]# pcs property set stonith-enabled=false
Cluster Resources
Prepare resources
Apache Web Server
pcs resource move <resource_group> <destination_node_name>
[root@node1 ~]# pcs node standby node1.itzgeek.local
Important Cluster Commands
Click cluster resources to see the list of resources and their details.
192.168.0.11 node1.itzgeek.local node1

192.168.0.12 node2.itzgeek.local node2
Install Packages
Here, we will configure the Apache web server, filesystem, and networks as resources for our cluster.
For a filesystem resource, we would be using shared storage coming from iSCSI storage.
[root@node1 ~]# pcs resource create httpd_ser apache configfile=”/etc/httpd/conf/httpd.conf” statusurl=”http://127.0.0.1/server-status” –group apache
Let’s check the failover of the resources by putting the active node (where all resources are running) in standby mode.
[root@storage ~]# systemctl enable target [root@storage ~]# systemctl restart target
dnf install -y pcs fence-agents-all pcp-zeroconf Login with cluster administrative user hacluster and its password.
pcs cluster start <node_name>
ls -al /dev/vg_apache/lv_apache
pcs property set maintenance-mode=true
InitiatorName=iqn.1994-05.com.redhat:121c93cbad3a
[root@node1 ~]# pvcreate /dev/sdb [root@node1 ~]# vgcreate vg_apache /dev/sdb [root@node1 ~]# lvcreate -n lv_apache -l 100%FREE vg_apache [root@node1 ~]# mkfs.ext4 /dev/vg_apache/lv_apache
InitiatorName=iqn.1994-05.com.redhat:827e5e8fecb
dnf install -y httpd
pcs cluster stop <node_name>
https://node_name:2224
[root@node1 ~]# pcs resource create httpd_vip IPaddr2 ip=192.168.0.100 cidr_netmask=24 –group apache
pcs resource status
[root@node1 ~]# pcs resource create httpd_fs Filesystem device=”/dev/mapper/vg_apache-lv_apache” directory=”/var/www” fstype=”ext4″ –group apache
[root@storage ~]# targetcli
/bin/systemctl reload httpd.service > /dev/null 2>/dev/null || true
FROM:
[root@node1 ~]# pcs host auth node1.itzgeek.local node2.itzgeek.local
In technical, if the server running application has failed for some reason (ex: hardware failure), cluster software (pacemaker) will restart the application on the working node.
vi /etc/httpd/conf/httpd.conf
Since we are not using fencing, disable it (STONITH). You must disable fencing to start the cluster resources, but disabling STONITH in the production environment is not recommended.
Change the below line.
The web interface will be accessible once you start pcsd service on the node and it is available on port number 2224.
This user account is a cluster administration account. We suggest you set the same password for all nodes.
Authorize the nodes using the below command. Run the below command in any one of the nodes to authorize the nodes.
[root@node2 ~]# pvscan [root@node2 ~]# vgscan [root@node2 ~]# lvscan
firewall-cmd --permanent --add-service=http firewall-cmd --reload
Create Resources
pcs cluster stop --all
All are running on VMware Workstation.
pcs property set maintenance-mode=false
systemctl start pcsd systemctl enable pcsd
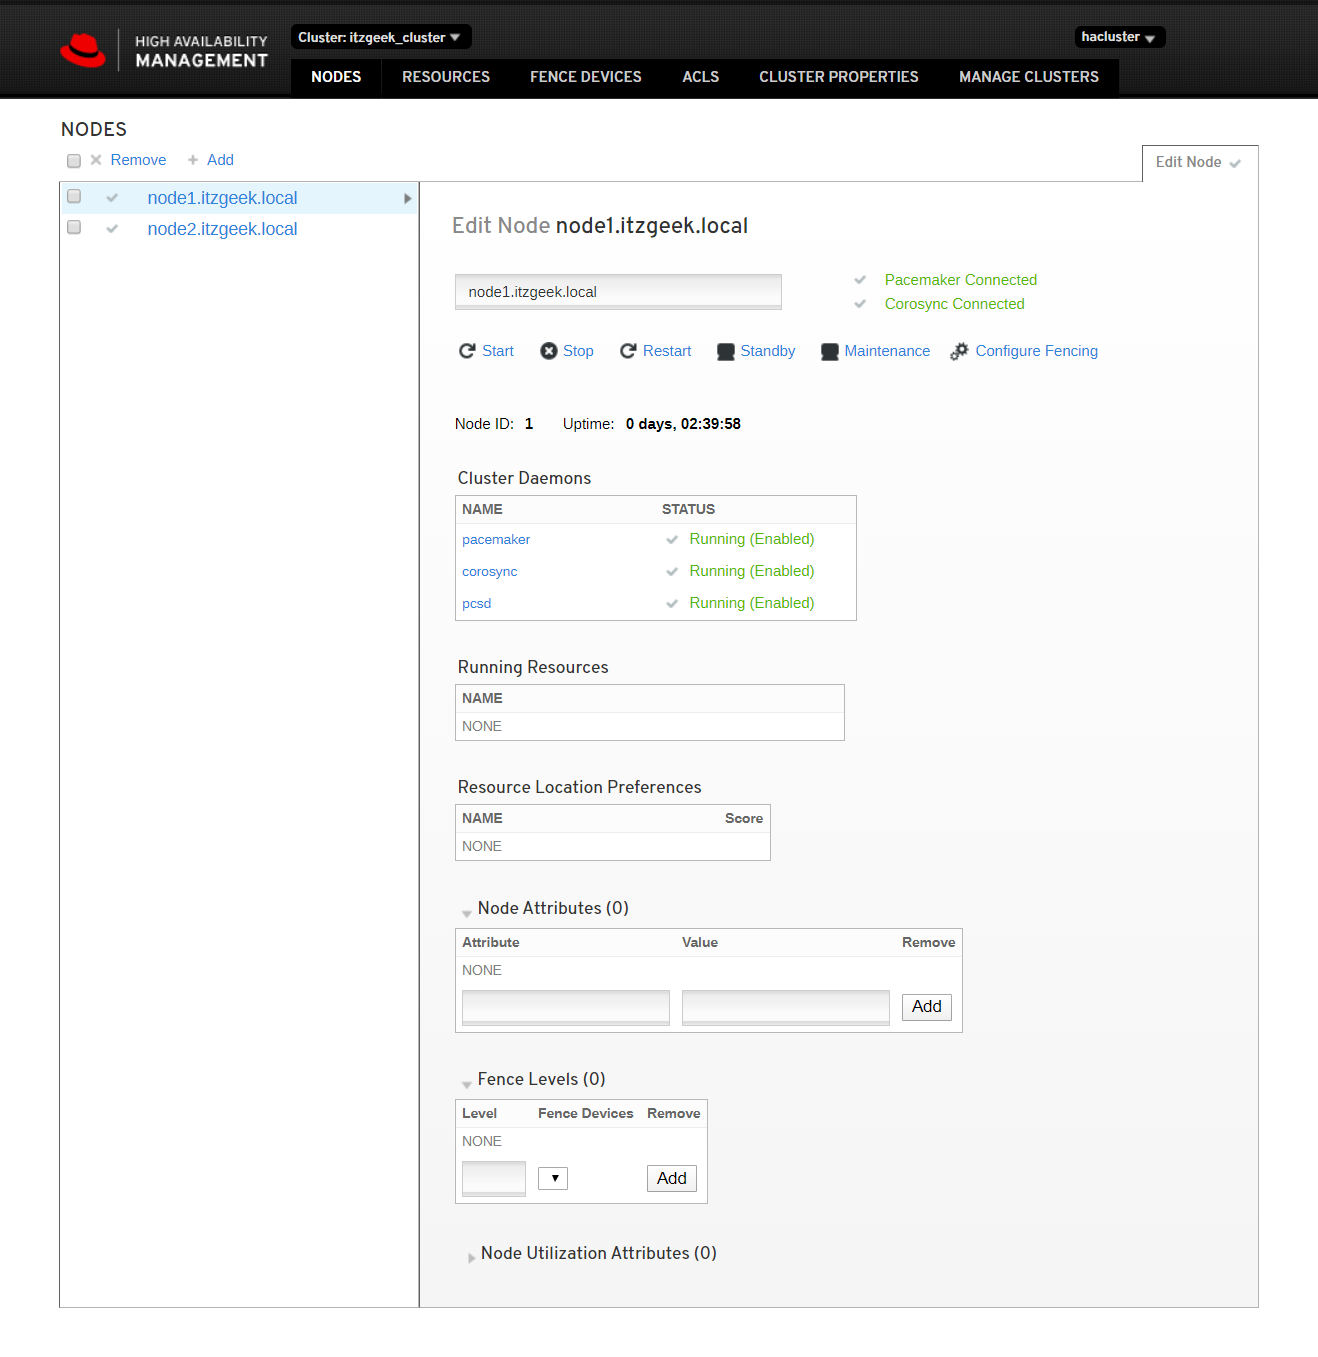
Click on the cluster name to see the details of the node.
cat /etc/iscsi/initiatorname.iscsi
systemctl restart iscsid systemctl enable iscsid
Setup Cluster Nodes
[root@node1 ~]# pcs cluster setup itzgeek_cluster –start node1.itzgeek.local node2.itzgeek.local
Output: No addresses specified for host 'node1.itzgeek.local', using 'node1.itzgeek.local'
No addresses specified for host 'node2.itzgeek.local', using 'node2.itzgeek.local'
Destroying cluster on hosts: 'node1.itzgeek.local', 'node2.itzgeek.local'...
node1.itzgeek.local: Successfully destroyed cluster
node2.itzgeek.local: Successfully destroyed cluster
Requesting remove 'pcsd settings' from 'node1.itzgeek.local', 'node2.itzgeek.local'
node1.itzgeek.local: successful removal of the file 'pcsd settings'
node2.itzgeek.local: successful removal of the file 'pcsd settings'
Sending 'corosync authkey', 'pacemaker authkey' to 'node1.itzgeek.local', 'node2.itzgeek.local'
node1.itzgeek.local: successful distribution of the file 'corosync authkey'
node1.itzgeek.local: successful distribution of the file 'pacemaker authkey'
node2.itzgeek.local: successful distribution of the file 'corosync authkey'
node2.itzgeek.local: successful distribution of the file 'pacemaker authkey'
Sending 'corosync.conf' to 'node1.itzgeek.local', 'node2.itzgeek.local'
node1.itzgeek.local: successful distribution of the file 'corosync.conf'
node2.itzgeek.local: successful distribution of the file 'corosync.conf'
Cluster has been successfully set up.
Starting cluster on hosts: 'node1.itzgeek.local', 'node2.itzgeek.local'...
Enable the cluster to start at the system startup.

