In a previous article, LFCS – How to Recover ROOT Password, I covered some basics on SELinux. In this article, I will cover a little more about SELinux.
SELinux is a way to use Access Control Lists (ACL) to manage the security of the Linux system.
NOTE: For anyone familiar with Windows, the Windows OS uses ACLs to manage security for applications. Every file and folder has a listing of user accounts that has specific access to that file or folder. In Linux, the ACL is based on the ‘label’ of the file or folder.
You may have heard of AppArmor which controls security based on file and folder paths. You can see some basics on AppArmor in the article ‘Securing Ubuntu with AppArmor’.
NOTE: Ubuntu uses AppArmor by default, while CentOS uses SELinux as its default security manager.
Labels
As I mentioned before, SELinux is based on the ‘label’ of a file or folder. Let’s look at one to see exactly what we are talking about.
Open a Terminal and type the following command:
ls /etc/samba
You should see a listing of three files, which is by default if you haven’t made any changes to Samba on your system. The files listed should be: ‘lmhosts’, ‘smb.conf’ and ‘smb.conf.example’.
If we wanted to look at the labels for the files, then we would run the command:
ls -Z /etc/samba
NOTE: If the folder doesn’t exist on your system, then you can use a different folder.
The output will look like that shown in Figure 1.

FIGURE 1
The beginning of each line starts with the permissions of the specific file. Next are the owner and group permissions. You can see that the owners of the three files are the ‘root’ user and the ‘root’ group. The SELinux User Context is the ‘system_u’ user. The SELinux Role is the ‘object_r’ role. Finally, the SELinux Type is the ‘samba_etc_t’ type. The last entry is the file name for which all of the settings are valid.
NOTE: The default is that SELinux is enabled so your output should be similar. If the output is not the same, then you may have SELinux in a state other than ‘enforced’.
SELinux on Ubuntu
NOTE: A very important note: the procedure below to remove AppArmor should NOT be used on any version of Ubuntu other than 18.04. You can completely cause failure with Ubuntu 20.04.
Before I get too far into checking on the state of SELinux, we need to make sure you have it. Ubuntu by default uses AppArmor. You can only use one of the Linux Security Modules (LSM) on a system. The kernel can only implement one LSM at a time, which is by design.
NOTE: Be sure that if you remove AppArmor, that you are sure you want to do it. If you can, perform this procedure on a system that can be re-installed or use a Virtual system such as VirtualBox. You can re-install AppArmor, but you may not want to take a chance of something going wrong on an important system. I performed this process quite a few times on a virtual machine of Ubuntu and it crashed the system quite often. I had the best outcome using the Ubuntu 18.04 Desktop ISO for a ‘Normal’ installation.
First, you will need to stop the AppArmor Service:
sudo systemctl stop apparmor
You can then run ‘sudo systemctl status apparmor’ to verify that the service is ‘inactive’. Just to be safe, you can disable the service as well:
sudo systemctl disable apparmor
In the next step, you have two choices. One is removing AppArmor which leaves enough of the information intact to reinstall it. The second option will purge AppArmor so you will be less likely to re-install it.
To remove AppArmor and leave the configuration intact, run the command:
sudo apt remove apparmor
To completely purge AppArmor and all configuration files, run this command:
sudo apt purge apparmor
At this point, you need to reboot your system to make sure the AppArmor Service has been removed or purged and no longer active.
After the system restarts, you can start installing SELinux with the following command:
sudo apt install selinux auditd selinux-basics policycoreutils selinux-utils audispd-plugins policycoreutils-gui
Once all the files and services are installed, you can activate SELinux with the following command:
sudo selinux-activate
When the command completes, you will be informed to reboot your system. Reboot then run the following command to change enforcement mode (discussed in the next section) and reboot the system:
sudo setenforce 0
When the system loads, you will need to change the security mode with one last command and then reboot again:
sudo selinux-config-enforcing
sudo reboot now
NOTE: Sometimes it seems this procedure for Ubuntu is hit-and-miss. I can perform the steps and it will work just fine. Other times the system is locked and corrupted. The procedure I listed seemed to have the best results of many that I tried to use.
The system will restart and while starting back up will issue another restart command after it relabels the file system for SELinux. You can see this occurring on an Ubuntu 18.04 system in Figure 2. Once the system restarts, then you can check on the SELinux Enforcement.
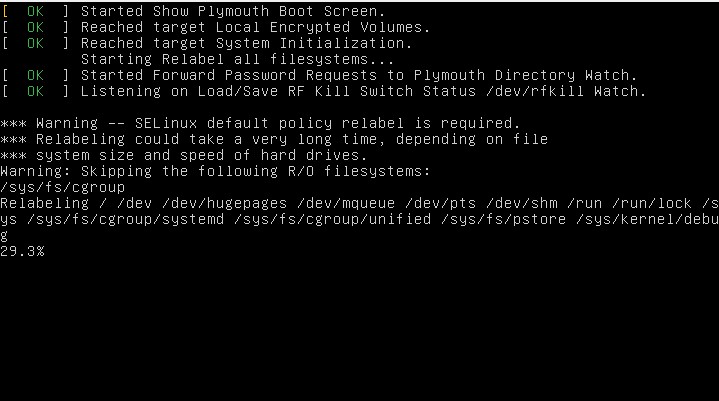
FIGURE 2
Fixing Ubuntu if it Fails
You need to reboot the system and press and hold the SHIFT key to get the GRUP Menu to appear. Once the menu appears, you will then highlight the OS you want to load. The default choice is usually the best. Once you have highlighted the proper entry, press the letter ‘e’ on the keyboard to edit the entry. When editing the GRUB Menu Entry you will see quite a few lines of code. Arrow down to the line which starts with ‘linux’. At the end of the line, you need to remove ‘quiet’ and ‘rghb’ whichever exists. Replace these with ‘enforcing=0’.
After these changes have been made you can press ‘CTRL+X’ to start the Menu Entry with the changes you made.
NOTE: The changes are not permanent and only affect the current session. The parameter ‘enforcing=0’ will place the Security-Enhanced Linux (SELinux) into Permissive Mode.
Log into the system as normal and open a Terminal. Edit the file ‘/etc/selinux/config’ with a text editor using ‘sudo’. Make sure the first uncommented line states ‘SELINUX=permissive’ and not ‘SELINUX=enforcing’. Save and exit your editor. Reboot the system.
At this point, the Ubuntu system should work fine. Any issues against the security policy will be logged, but allowed to execute.
Checking and Changing Enforcement
Before we get too far into checking for enforcement, you need to know there can be three different security states for SELinux.
- Enforcing – the rules are enforced
- Permissive – rules can be broken with a message given when it is
- Disabled – no security rules are used and no logging
You can verify that SELinux is running with the command:
sestatus
The command should show something similar to Figure 3.
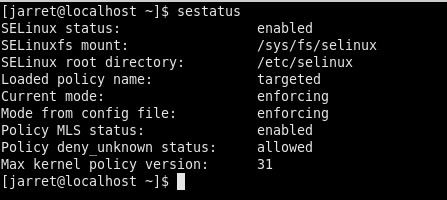
FIGURE 3
You could also issue the command ‘getenforce’ which will respond with ‘Enforcing’, ‘Permissive’ or ‘Disabled’.
Other than checking the status, you can set the status in the configuration file found at ‘/etc/selinux/config’ as shown in Figure 4. The value can be set in the ‘SELINUX=enforcing’ line. You can change the value, save and reboot.
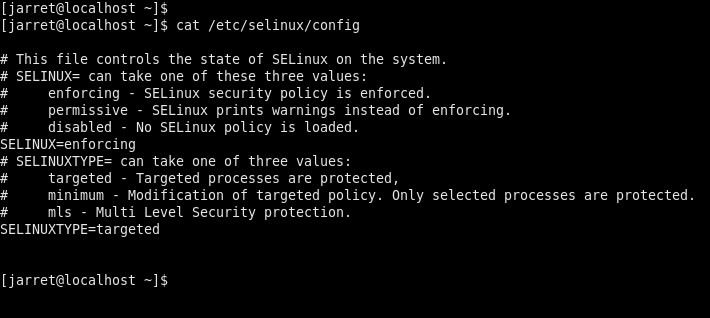
FIGURE 4
Another option to change the value is to use the command ‘setenforce’. You can change the status to ‘enforcing’ or ‘permissive’, but you do not disable it with the ‘setenforce’ command.
To change to ‘Enforcing’ mode, you use the command ‘setenforce 1’ or ‘setenforce Enforcing’. For ‘permissive’ mode you can use ‘setenforce 0’ or ‘setenforce Permissive’.
If you look back at the procedure of setting up Selinux, you will notice that we booted into permissive mode. Booting into Permissive Mode allows the system to prepare itself for SELinux while still being in a state of ‘anything goes’. Once the system starts with SELinux active, you can then more easily change to Enforcement Mode.
SELinux Logging
The SELinux logs can be found at ‘/var/log/audit/audit.log’. If you want to view the log, you can use the command ‘audit2allow ‘-a’. The ‘-a’ parameter allows the program to read from the default log file. You can receive output similar to Figure 5, for CentOS, and Figure 6, for Ubuntu.
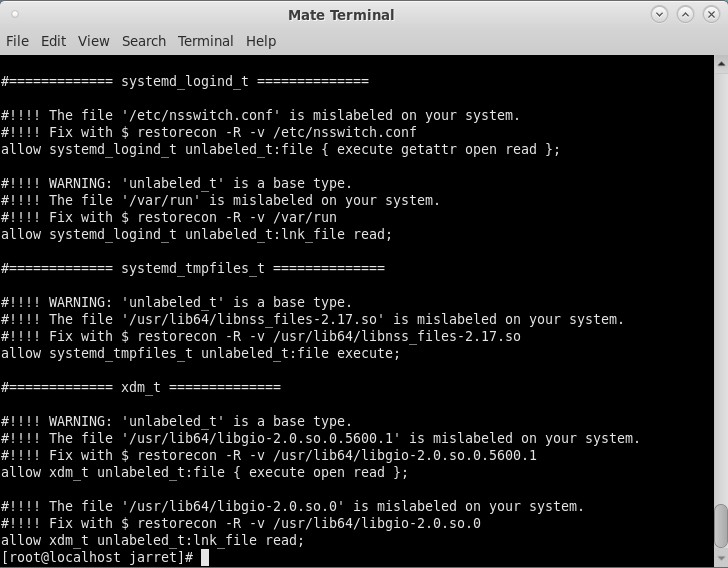
FIGURE 5
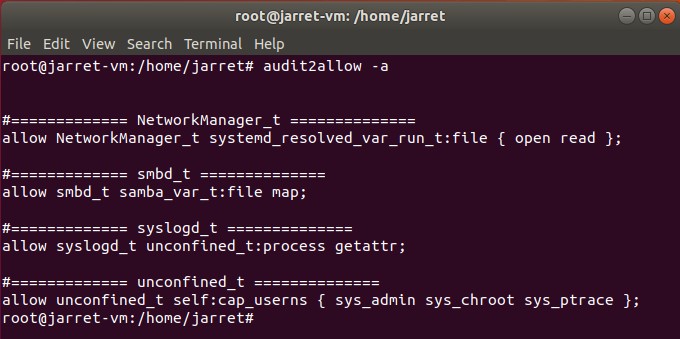
FIGURE 6
The above listings are a little more readable than when using the ‘cat’ command to view the SELinux log file. The listings can be used to modify the policy used by SELinux.
With any item in the listing, you can create a file to be used to modify the policy. For instance, in Figure 5, there are a few issues that we will look to fix. Remember that these notifications are being generated by SELinux during normal use.
sudo audit2allow -a -M policyfix
The command creates a new file called ‘policyfix’, which can be named whatever proper filename you choose. The file will contain the information needed to change the policy to prevent the same reports in the log file. You can see the command executed on CentOS in Figure 7.
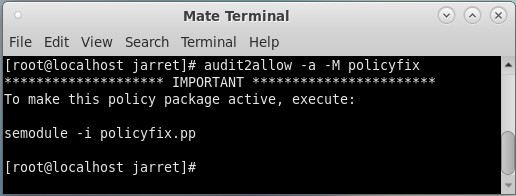
FIGURE 7
The command will create two files: ‘policyfix.te’ and ‘policyfix.pp’. The command ‘sudo semodule -i policyfix.pp’ can be executed to import the ‘fixes’ into the policy.
NOTE: Once you have changed the policy, you can delete the contents of the audit log to make sure the same messages are not continuing. To delete the contents of the log use the command ‘> /var/log/audit/audit.log’ but make sure you perform ‘sudo su’ first.
It is possible to change individual policies manually with Booleans.
SELinux Booleans
To begin, let’s look at the listing of the existing Booleans and settings. To get the listing, use the command:
semanage boolean -l
The listing has four columns. The first column is the Boolean itself. The second column is the current state of the Boolean, whether ‘on’ or ‘off’. The third column lists the ‘Default’ value. The final column is a description of the Boolean. An example from an Ubuntu system is shown in Figure 8.
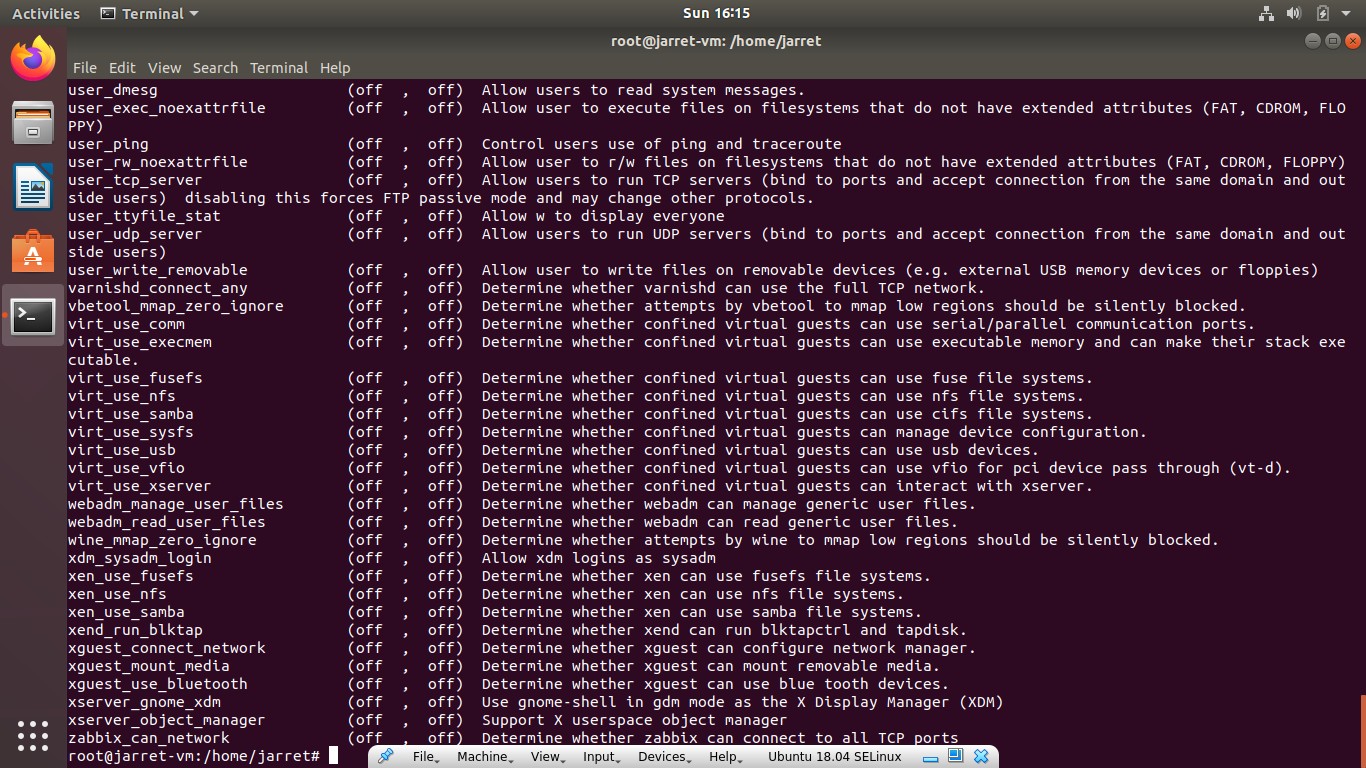
FIGURE 8
The Boolean settings can be found at ‘/sys/fs/selinux/booleans’. You can edit the file directly, but it is suggested you use the command ‘setsebool’.
So, to change a value you use the command:
setsebool <Boolean Name> on|off
Let’s take an example of allowing SAMBA to create home directories. By default, the ability is off. The Boolean is ‘samba_create_home_dirs’ and we want to turn it ‘on’. The command would be:
setsebool samba_create_home_dirs on
Once you set this in a Terminal the setting will be immediately enabled. The problem is that the Boolean will be enabled until the system reboots and the policy reloads. The change only changes the policy in memory and not on the hard disk. If you want to make the change to the actual file, then use the parameter ‘-P’ as follows:
setsebool -P samba_create_home_dirs on
Ports
TCP/IP Port numbers can also be controlled by SELinux. To see the available ports to control, use the command:
semanage port -l
If you list them, there are three columns. The first is the port name, the second is the type (tcp/udp) and the last column is the port number.
If we want to add the tcp port number 8090 to ‘http_port_t’, then the command is:
sudo semanage port -a -t http_port_t -p tcp 8090
If you reissue the command ‘sudo semanage port -l | grep http_port_t’ you will now see that port 8090 is included in the list of allowed ports.
To change the values for the Firewall, you would have to make changes with the ‘firewall-cmd’ command.
Conclusion
I hope this helps make SELinux usage a little easier and understandable.
Spend time changing values and viewing the lists before taking the exam. SELinux can help make your administrative tasks easier by providing security to allow or prevent certain things on your server and other systems.


![rsync: Exclude Files and Directories [Examples]](https://linuxpunx.com/wp-content/uploads/2023/07/rsync-exclude-files-and-directories-examples-7-768x432.png)

