(By Michael West, Technical Product Manager, VMware)

With the release of vSphere 7 Update 1, VMware has extended the capability of vSphere with Tanzu (formerly vSphere 7 with Kubernetes) to more fully support your existing vSphere environment. The fastest way to provide developer ready Kubernetes infrastructure to DevOps teams is through vSphere with Tanzu.
Tanzu Kubernetes clusters now can be connected directly to your vSphere Distributed Switch (vDS) and use independent load-balancers to get you up and running in under 60 minutes without being a Kubernetes expert or learning new networking technologies. For those with more complex environments, VMware Cloud Foundation (VCF) with Tanzu still includes the advanced networking capabilities of NSX and is the best way to scale your infrastructure for large deployments. This blog and demonstration video explore the changes introduced to support a vDS architecture and enablement process.
What is vSphere with Tanzu?
Contents
Let’s start with a refresher on the core capability of vSphere with Tanzu. We are embedding a Kubernetes control plane into vSphere and deploying Kubernetes agents onto ESXi hosts – turning them into Kubernetes worker nodes. The Kubernetes Agents are called Spherelets. The embedded kubernetes cluster is managed through a service that is part of vCenter. We call this the Supervisor Cluster.
Enabling Kubernetes exposes a set of capabilities in the form of services that can be consumed by Developers. Primarily, DevOps teams can use the Tanzu Kubernetes Grid Service to do self service deployments of their own Tanzu Kubernetes clusters. TKG clusters are fully compliant, upstream aligned Kubernetes clusters that can be controlled by developers. Self-service deployment is done by submitting a straightforward cluster specification to the Supervisor Cluster Kubernetes API.
Configuring the vSphere Distributed Switch (vDS)
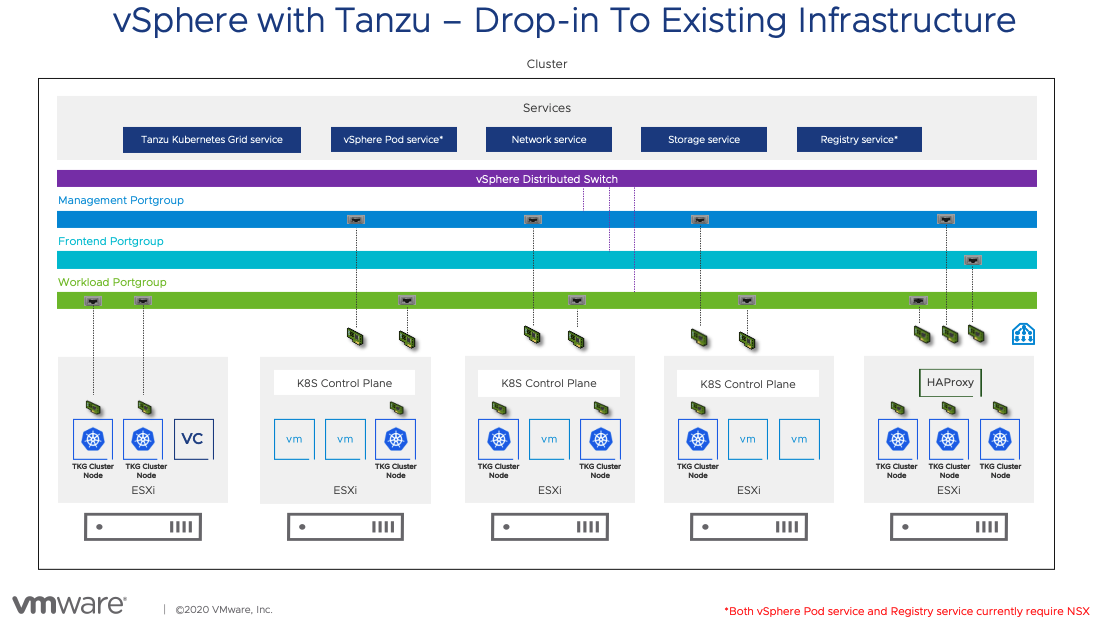
The Network Service has been extended to support the vSphere Distributed Switch (vDS). Start by configuring the switch with appropriate portgroups. Management will carry traffic between vCenter and the Kubernetes Control Plane (Supervisor Cluster control plane). As we will see in a moment, not having the built in Load Balancing capability of NSX means you will need to deploy your own load balancer externally from the cluster. We will give you a choice of integrated load balancers. The first one we support is HAProxy.
The Management network will also carry traffic between the supervisor cluster nodes and HAProxy. The Frontend network will carry traffic to the Load Balancer virtual interfaces. It must be routable from any device that will be a client for your cluster. Developers will use this to issue kubectl commands to the Supervisor cluster or their TKG clusters. You can have one or more Workload networks.
The primary Workload network will connect the cluster interfaces of the Supervisor cluster. Namespaces can be defined with their own Workload network allowing for isolation between development teams assigned different Namespaces. The Namespace assigned Workload Networks will connect the TKG cluster nodes in that Namespace.
Deploy the Load Balancer
HAProxy is deployed through an OVF file and contains a configuration wizard completed as part of the deployment. You must give it the Management Network configuration and then decide if you want a separate Frontend Network. It is optional. You might decide to simply use a single network and split it between the IPs needed for the Load Balancer VIPs and IPs needed for the TKG cluster nodes.
It is very important to know that HAProxy expects you to use CIDR notation (example: 192.168.120.128/25) to define the IPs for the Load Balancers and it will take control of those IPs immediately. So be careful in choosing non-overlapping ranges. Once you define the Load Balancer network and HAProxy Interface on that network, you will choose a Workload Network and assign it an IP. Once that is done, power it on and you are ready to enable vSphere with Tanzu.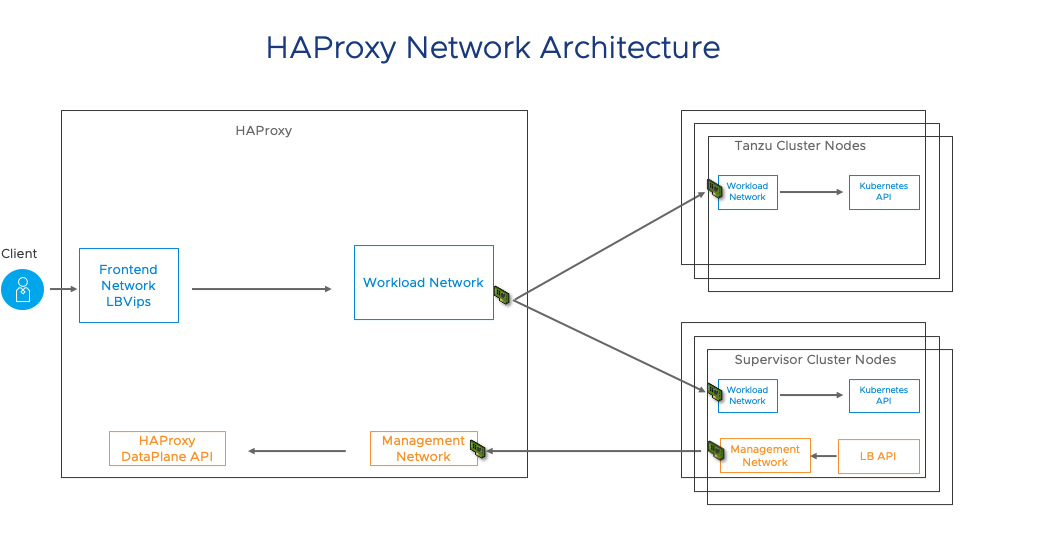
Let’s use an example where we have three separate subnets available and we separate Frontend and Workload networks into separate subnets. This is not a requirement and you can use a much smaller configuration.
- Management Network: 192.168.110.0/24
- Frontend Network: 192.168.130.0/24
- Workload Network: 192.168.120.0/24
We will start by choosing an IP for an interface on the HAProxy VM for each of these networks.
- Management IP: 192.168.110.65
- Frontend IP: 192.168.130.3
- Workload IP: 192.168.120.5
Now we need to define the range of IPs that HAProxy will manage and assign as Load Balancer VIPs. HAProxy uses the AnyIP feature of the Linux Kernel to bind a complete range of IPs to your system. It requires that the subnet is provided in CIDR format (ie. 192.168.130.x/xx). This can be confusing because it is not actually creating a new subnet on your existing network, but is simply providing an IP range in CIDR format for Linux to manage.
- Frontend VIP range: 192.168.130.128/25 means that IPs from 192.168.130.128 to 192.168.130.255 can be assigned as Load Balancer VIPs. These VIPs can be used across more than one Supervisor Cluster. When deploying the Supervisor Cluster, you will assign a subset of this range to your cluster. One other note: be sure that you do not assign your gateway in the AnyIP range or HAProxy will try to respond to that IP.
Enable vSphere With Tanzu
If you are familiar with the supervisor enablement from an earlier release, this process will be very straightforward. You will choose an ESXi cluster to enable (Make sure HA and DRS are turned on so the cluster is compatible) and select whether to use NSX or vDS based networking. Next you must configure the Management and Workload interfaces on the Supervisor Control plane nodes. Your HAProxy appliance is able to provide Load Balancer services for more than one Supervisor cluster, so you not only have to specify where you are getting these services in the deployment wizard, but also the range of IPs from that Frontend network CIDR that should be available to this Supervisor cluster.
You will need to select a storage policy for node placement, so be sure to create that ahead of time. Finally, when Developers create their own TKG clusters, the VMs are deployed with base images that contain the appropriate versions of Kubernetes configuration. Those base images are stored in a Content Library that is subscribed to a Content Delivery Network (CDN) where VMware publishes the images. You must create that content library and specify it in this wizard. That is it. You will be up and running in a few minutes.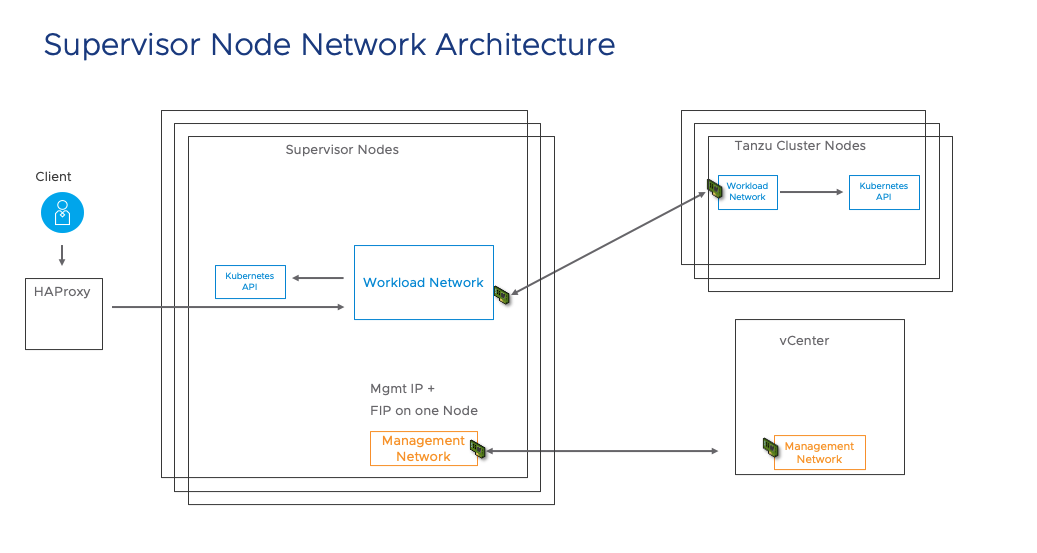
Your network configuration for your Supervisor Cluster, based on how we set up HAProxy above might look something like this:
- Management Network: 192.168.110.66
- You will need 5 IPs and only need to specify the starting IP
- Frontend Network: 192.168.130.129 – 192.168.130.254
- You take a range of IPs from the AnyIP CIDR you specified in the HAProxy config.
- Workload Network: 192.168.120.6 -192.168.120.254
- These IPs will be assigned to the nodes of your Supervisor and TKG clusters.
Let’s see it in action!!
This video will walk through a short explanation of the architecture, then a demonstration of the configuration of the Supervisor cluster and finally a TKG cluster deployment.
Other Links:
Also, checkout my VMworld 2020 session that covers this material in more detail.
https://www.vmworld.com/en/learning/sessions.html.
Title: vSphere with Tanzu: Deep Dive into the New vDS Based Network Architecture.
If you would like to try an interactive Hands on Lab: labs.hol.vmware.com LabID: HOL-2113-01-SDC
There is also a quick start guide available here: https://core.vmware.com/resource/vsphere-tanzu-quick-start-guide
We are excited about these new releases and how vSphere is always improving to serve our customers and workloads better in the hybrid cloud. We will continue posting new technical and product information about vSphere with Tanzu & vSphere 7 Update 1 on Tuesdays, Wednesdays, and Thursdays through the end of October 2020! Join us by following the blog directly using the RSS feed, on Facebook, and on Twitter, and by visiting our YouTube channel which has new videos about vSphere 7 Update 1, too. As always, thank you, and please stay safe.

