Leveraging VMware PKS in VMware cloud on AWS:
Contents
Since the announcement of VMware Tanzu—a portfolio of products and services to help enterprises build, run and manage applications on Kubernetes—at VMworld US, our customers have been expressing their excitement. They are eager to drive adoption of Kubernetes and are looking to VMware to simplify the effort. That’s why we want to highlight VMware PKS as an effective way to run cloud native applications in VMware Cloud on AWS right now.
Kubernetes Installation:
The setup documentation provided for PKS was leveraged to install the required packages and software for Kubernetes. Kubernetes and docker components were deployed successfully on a Centos 7.6 virtual machine.
Deployed Solution:
Templates with the required software and components were created on CentOS Linux 7.6 for both master and worker nodes in the environment. Docker with required images was installed in all the templates. A list of all the docker images are shown in Appendix B. The solution was designed for a proof of concept with one master node and four worker nodes. A profile of a typical node used to build out the environment is shown below
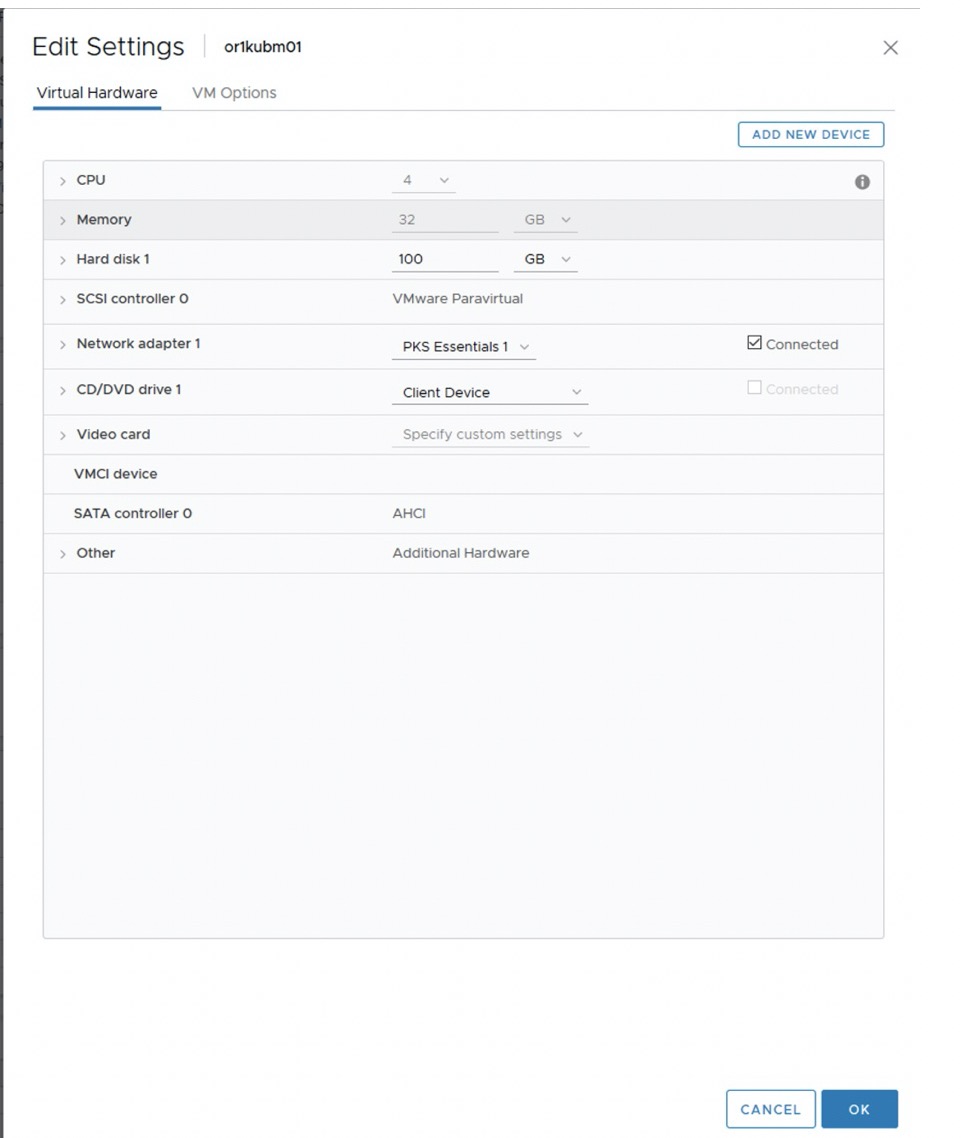
Figure 1: Virtual machine specifications used for the PKS master and worker nodes
A resource pool was created in a VMware cloud for AWS instance and the created templates for master (or1kubm01) and worker nodes (or1kubw01 through or1kubw04) were deployed as shown below.
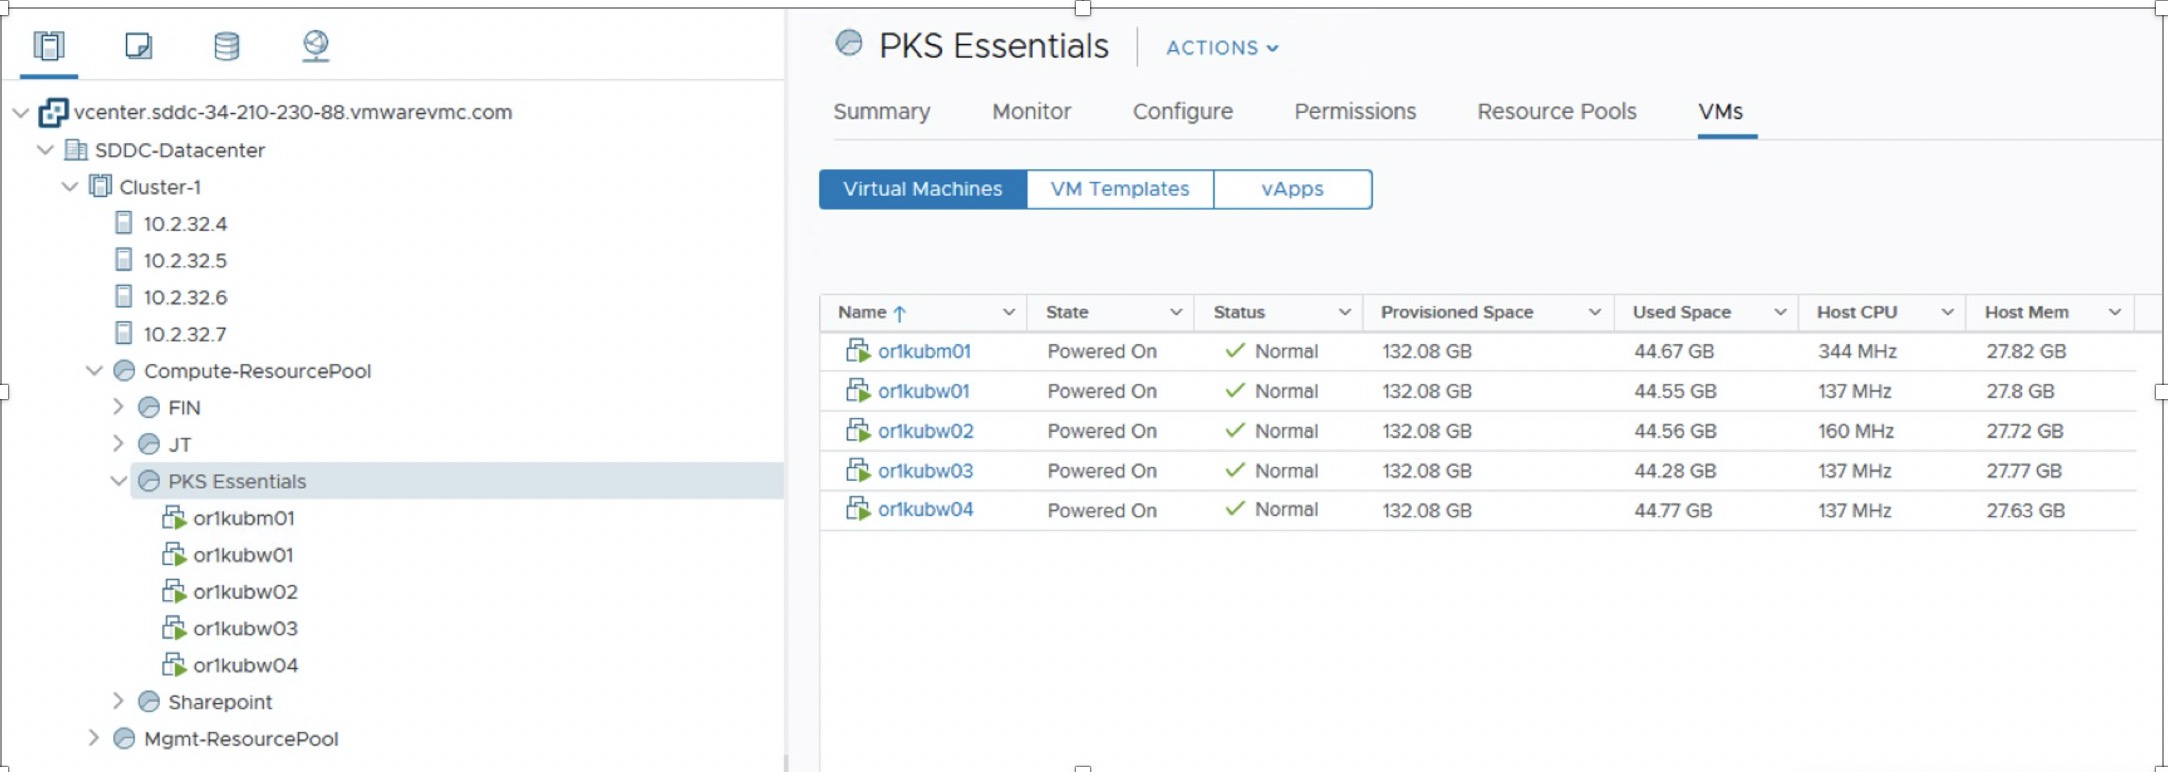
Figure 2: Resource pool showing PKS master and worker node components
Once the virtual machines are deployed, the master server needs to be configured to deploy the Kubernetes control plane. The configuration file used is shown below
|
1 2 3 4 5 6 7 8 9 10 11 12 13 14 15 16 17 18 19 20 21 22 23 24 25 26 27 28 29 |
<em>[root@or1kubmo1 ~]# cat kubeadm-config.yaml</em> <em>apiVersion: kubeadm.k8s.io/v1beta1</em> <em>kind: ClusterConfiguration</em> <em>imageRepository: vmware</em> <em>kubernetesVersion: v1.14.3+vmware.1</em> <em>apiServer:</em> <em>certSANs:</em> <em>– “192.168.7.21”</em> <em>controlPlaneEndpoint: “192.168.7.21:6443”</em> <em>networking:</em> <em>podSubnet: “10.244.0.0/16”</em> <em>etcd:</em> <em>local:</em> <em>imageRepository: vmware</em> <em>imageTag: v3.3.10_vmware.1</em> |
Initializing the master control node
The master node is initialized using the configuration file and the control pane components are installed as shown below.
|
1 2 3 4 5 6 7 8 9 10 11 12 13 14 15 16 17 18 19 20 21 22 23 24 25 26 27 28 29 30 31 32 33 34 35 36 37 38 39 40 41 42 43 44 45 46 47 48 49 50 51 52 53 54 55 56 57 58 59 60 61 |
<em>[root@or1kubmo1 ~]# kubeadm init –config kubeadm-config.yaml –ignore-preflight-errors=ImagePull</em> <em> Using Kubernetes version: v1.14.3+vmware.1</em> <em>.</em> <em>.</em> <em>.</em> <em>[certs] Generating “apiserver” certificate and key</em> <em>[certs] apiserver serving cert is signed for DNS names [or1kubmo1 kubernetes kubernetes.default kubernetes.default.svc kubernetes.default.svc.cluster.local] and IPs [10.96.0.1 192.168.7.21 192.168.7.21 192.168.7.21]</em> <em>[certs] Generating “apiserver-kubelet-client” certificate and key</em> <em>[certs] Generating “front-proxy-ca” certificate and key</em> <em>[certs] Generating “front-proxy-client” certificate and key</em> <em>[certs] Generating “sa” key and public key</em> <em>[kubeconfig] Using kubeconfig folder “/etc/kubernetes”</em> <em>[kubeconfig] Writing “admin.conf” kubeconfig file</em> <em>[kubeconfig] Writing “kubelet.conf” kubeconfig file</em> <em>[kubeconfig] Writing “controller-manager.conf” kubeconfig file</em> <em>[kubeconfig] Writing “scheduler.conf” kubeconfig file</em> <em>[control–plane] Using manifest folder “/etc/kubernetes/manifests”</em> <em>[control–plane] Creating static Pod manifest for “kube-apiserver”</em> <em>[control–plane] Creating static Pod manifest for “kube-controller-manager”</em> <em>[control–plane] Creating static Pod manifest for “kube-scheduler”</em> <em>[etcd] Creating static Pod manifest for local etcd in “/etc/kubernetes/manifests </em> <em>[wait-control-plane] Waiting for the kubelet to boot up the control plane as static Pods from directory “/etc/kubernetes/manifests“. This can take up to 4m0s</em> <em>[apiclient] All control plane components are healthy after 15.502047 seconds</em> <em>[upload-config] storing the configuration used in ConfigMap “kubeadm–config” in the “kube–system“ Namespace</em> <em>Your Kubernetes control–plane has initialized successfully!</em> <em>Once the cluster is setup, the environment of the user needs to be customized to be able to access the cluster seamlessly. The following steps are required to setup the user environment</em> <em> mkdir –p $HOME/.kube</em> <em> sudo cp –i /etc/kubernetes/admin.conf $HOME/.kube/config</em> <em> sudo chown $(id –u):$(id –g) $HOME/.kube/config</em> |
Adding worker nodes to the Kubernetes Cluster
Worker nodes can join the cluster by copying certificate authorities and service account keys on each node and then running the join command as root
|
1 2 3 4 5 6 7 8 9 10 11 12 13 14 15 16 17 18 19 20 21 22 23 24 25 26 27 28 29 30 31 32 33 34 35 36 37 38 39 40 41 42 43 44 45 46 47 48 49 50 51 52 53 54 55 56 57 |
<em> </em>[root@or1kubw03 ~]# kubeadm join 192.168.7.21:6443 –token k3qymg.i72xtv4xbz9farg6 –discovery-token-ca-cert-hash sha256:25233a62c738dab5acfbfa846abf29898ebeaaa9610cc65a63cf71bbbd19ad60 [preflight] Running pre–flight checks [WARNING IsDockerSystemdCheck]: detected “cgroupfs” as the Docker cgroup driver. The recommended driver is “systemd”. Please follow the guide at https://kubernetes.io/docs/setup/cri/ [preflight] Reading configuration from the cluster... [preflight] FYI: You can look at this config file with ‘kubectl -n kube-system get cm kubeadm-config -oyaml’ [kubelet–start] Downloading configuration for the kubelet from the “kubelet-config-1.14” ConfigMap in the kube–system namespace [kubelet–start] Writing kubelet configuration to file “/var/lib/kubelet/config.yaml” [kubelet–start] Writing kubelet environment file with flags to file “/var/lib/kubelet/kubeadm-flags.env” [kubelet–start] Activating the kubelet service [kubelet–start] Waiting for the kubelet to perform the TLS Bootstrap... This node has joined the cluster: * Certificate signing request was sent to apiserver and a response was received. * The Kubelet was informed of the new secure connection details. Run ‘kubectl get nodes’ on the control–plane to see this node join the cluster. Kubernetes Cluster Details: From the master node one can run the control commands like kubectl to get details about the cluster. The details of the cluster nodes and their roles are shown below. The master node is or1kubm01 and the worker nodes are or1kubw01 to or1kubw04. So now that the cluster is functional, we will look at deploying an example application. [root@or1kubmo1 ~]# kubectl get nodes -o wide NAME STATUS ROLES AGE VERSION INTERNAL–IP EXTERNAL–IP OS–IMAGE KERNEL–VERSION CONTAINER–RUNTIME or1kubmo1 Ready master 26h v1.14.3+vmware.1 192.168.7.21 <none> CentOS Linux 7 (Core) 3.10.0–957.21.3.el7.x86_64 docker://18.9.7 or1kubw01 Ready <none> 25h v1.14.3+vmware.1 192.168.7.22 <none> CentOS Linux 7 (Core) 3.10.0–957.21.3.el7.x86_64 docker://18.9.7 or1kubw02 Ready <none> 25h v1.14.3+vmware.1 192.168.7.23 <none> CentOS Linux 7 (Core) 3.10.0–957.21.3.el7.x86_64 docker://18.9.7 or1kubw03 Ready <none> 25h v1.14.3+vmware.1 192.168.7.24 <none> CentOS Linux 7 (Core) 3.10.0–957.21.3.el7.x86_64 docker://18.9.7 or1kubw04 Ready <none> 25h v1.14.3+vmware.1 192.168.7.25 <none> CentOS Linux 7 (Core) 3.10.0–957.21.3.el7.x86_64 docker://18.9.7 |
Example Web Server deployment:
A simple cloud native web server such as NGINX was then deployed on the Kubernetes cluster. The application components and the deployment aspects are defined as code using yaml. The yaml file used for the deployment is shown in Appendix A.
Kubectl is the control command used to create pods in Kubernetes. The NGINX server is created using the following kubectl command as shown.
|
1 2 3 4 5 6 7 8 9 10 11 12 13 14 15 16 17 18 19 20 21 22 23 24 25 26 27 28 29 30 31 32 33 34 35 36 37 |
[root@or1kubmo1 ~]# kubectl apply -f deployment.yaml service/nginx created deployment.apps/nginx created <em> </em>The NGINX pod is now running as shown and further details about this pods and its ports are also shown. [root@or1kubmo1 ~]# kubectl get pods NAME READY STATUS RESTARTS AGE influxdb 1/1 Running 0 7h35m nginx–64f5bc744f–xqlj4 1/1 Running 0 34s [root@or1kubmo1 ~]# kubectl describe pod/nginx-64f5bc744f-xqlj4 | grep -i node Node: or1kubw02/192.168.7.23 Node–Selectors: <none> Tolerations: node.kubernetes.io/not–ready:NoExecute for 300s node.kubernetes.io/unreachable:NoExecute for 300s [root@or1kubmo1 ~]# kubectl get service NAME TYPE CLUSTER–IP EXTERNAL–IP PORT(S) AGE kubernetes ClusterIP 10.96.0.1 <none> 443/TCP 26h nginx NodePort 10.110.34.216 <none> 80:30500/TCP 77s <em> </em> |
The NGINX server network port 80 is mapped to 30500 on the node. We now access the port 30500 on the node or1kubw02/192.168.7.23 via the web browser to see if the application is up. As shown below we see that NGINX has been successfully deployed and running as shown below.
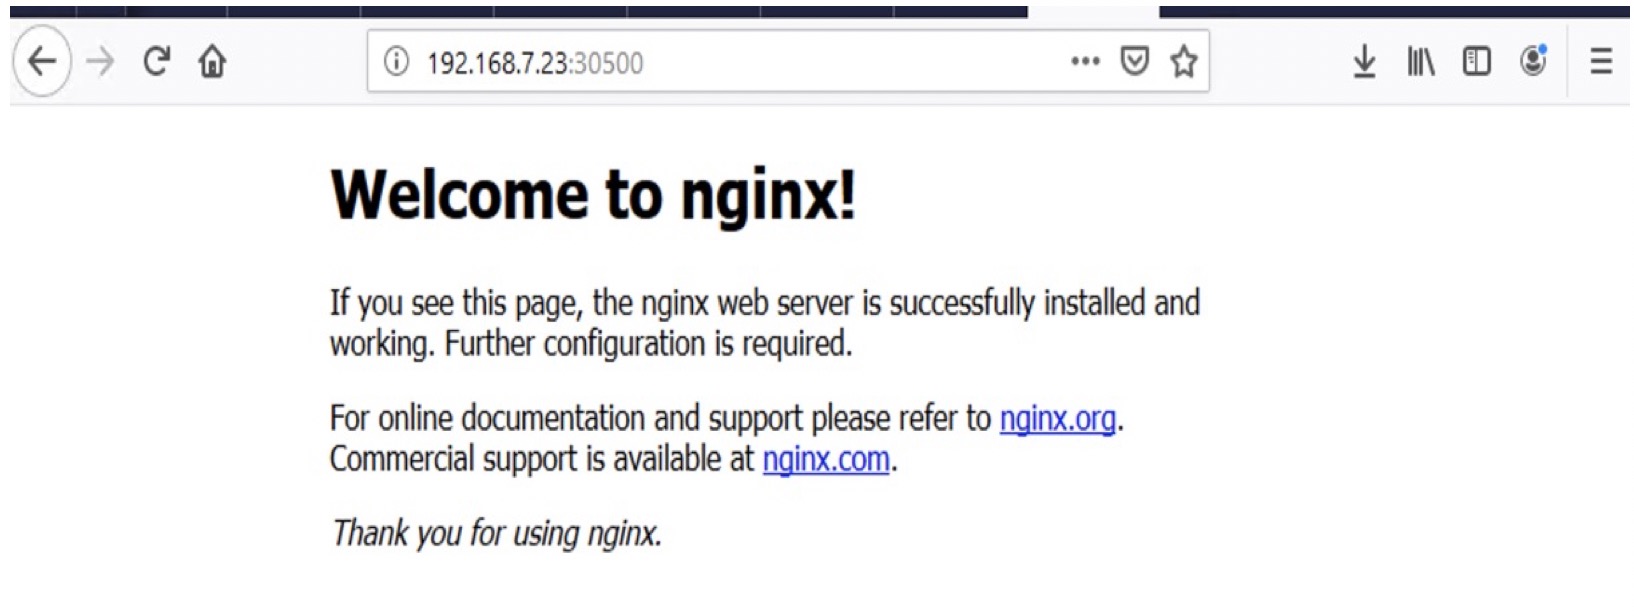
Figure 3: Accessing the NGINX application running on the PKS cluster
Conclusion:
In this solution, we leveraged VMware Cloud on AWS infrastructure to deploy VMware PKS. This solution provides a fully featured Kubernetes environment that can be used for hosting cloud native applications. An example application was deployed and validated in the Kubernetes environment. VMware customers can leverage VMware PKS in their cloud environment to deploy their Kubernetes based applications.
|
1 2 3 4 5 6 7 8 9 10 11 12 13 14 15 16 17 18 19 20 21 22 23 24 25 26 27 28 29 30 31 32 33 34 35 36 37 38 39 40 41 42 43 44 45 46 47 48 49 50 51 52 53 54 55 56 57 58 59 60 61 62 63 64 65 66 67 68 69 70 71 72 73 74 75 76 77 78 79 80 81 82 83 84 85 86 87 88 89 90 91 |
apiVersion: v1 kind: Service metadata: labels: app: nginx name: nginx spec: ports: – nodePort: 30500 port: 80 protocol: TCP targetPort: 80 selector: app: nginx type: NodePort — apiVersion: apps/v1 kind: Deployment metadata: name: nginx labels: app: nginx annotations: monitoring: “true” spec: replicas: 1 selector: matchLabels: app: nginx template: metadata: labels: app: nginx spec: containers: – image: nginx name: nginx ports: – containerPort: 80 resources: limits: memory: “2Gi” cpu: “1000m” requests: memory: “1Gi” cpu: “500m |
|
1 2 3 4 5 6 7 8 9 10 11 12 13 14 15 16 17 18 19 20 21 22 23 24 25 26 27 28 29 30 31 32 33 34 35 36 37 38 39 40 41 42 43 44 45 46 47 48 49 50 51 |
[root@or1kubmo1 ~]# docker images REPOSITORY TAG IMAGE ID CREATED SIZE calico/node v3.5.7 0654090e64a6 2 weeks ago 72.7MB calico/cni v3.5.7 262d08311b33 2 weeks ago 83.6MB vmware/pause 3.1 653725ea1930 5 weeks ago 738kB vmware/kube–proxy v1.14.3_vmware.1 49843d1a645b 5 weeks ago 82MB vmware/kube–scheduler v1.14.3_vmware.1 67f3935b500b 5 weeks ago 81.5MB vmware/kube–controller–manager v1.14.3_vmware.1 0eac8f3ad240 5 weeks ago 158MB vmware/kube–apiserver v1.14.3_vmware.1 540cb489423c 5 weeks ago 210MB <none> <none> 0843aace1c07 8 weeks ago 738kB vmware/kube–scheduler v1.14.2_vmware.1 78de05f8b171 8 weeks ago 81.5MB vmware/kube–proxy v1.14.2_vmware.1 4ad8680a9b75 8 weeks ago 82MB vmware/kube–apiserver v1.14.2_vmware.1 a73c630cc1a3 8 weeks ago 210MB vmware/kube–controller–manager v1.14.2_vmware.1 66b9d6982774 8 weeks ago 158MB vmware/coredns 1.3.1 a34e8f89cf00 3 months ago 35.1MB vmware/coredns v1.3.1_vmware.1 a34e8f89cf00 3 months ago 35.1MB vmware/etcd 3.3.10 1fdeee0e07ec 3 months ago 64.7MB vmware/etcd v3.3.10_vmware.1 1fdeee0e07ec 3 months ago 64.7MB gcr.io/heptio–hks/pause 3.1 1aa913e6f9fb 5 months ago 738kB gcr.io/heptio–hks/kube–proxy v1.13.2–heptio.1 659fce7158a5 5 months ago 80.2MB gcr.io/heptio–hks/kube–controller–manager v1.13.2–heptio.1 16037271ea31 5 months ago 146MB gcr.io/heptio–hks/kube–apiserver v1.13.2–heptio.1 edbcec4ac1b8 5 months ago 181MB gcr.io/heptio–hks/kube–scheduler v1.13.2–heptio.1 29a35f8bd745 5 months ago 79.5MB gcr.io/heptio–hks/coredns v1.2.6–heptio.1 c9dd6a4fcb3b 6 months ago 34.9MB gcr.io/heptio–hks/etcd v3.2.24–heptio.1 21787bf39a88 8 months ago 60.1MB k8s.gcr.io/pause 3.1 da86e6ba6ca1 19 months ago 742kB |


