Multi-cast Domain Name Service (mDNS) is used to provide name resolution on a local network. The use of the service allows a network to use host-names instead of IP addresses. The zero-configuration allows a network to not need a DNS Server.
When a system needs to resolve a host-name to an IP address it sends out a special packet that queries the systems on the network to respond if the host-name matches. The system which has the host-name will respond to the inquiring system. The packet contains the IP address of the responding system.
How it works
For instance, there could be a system on the network named ‘Desktop1’ which is trying to open a web page on a server named ‘WebServer’. In the browser, you may want to type in the address of ‘http://WebServer’. If there is no name resolution or a static IP address in the ARP cache then this will not work.
With mDNS, the ‘Desktop1’ system sends out a packet to the network. The packet is sent as broadcast and contains the name of the other host, ‘WebServer’, and the IP Address of ‘Desktop1’. All the systems on the local network receive the packet and check the host-name listed in the packet. If the name matches the local host-name then the system will respond to the sending system. A packet is created including the necessary response details so the initial system will know it is a response to the mDNS packet it sent out. The packet includes the IP address of the responding system, ‘WebServer’, and is sent to the system that broadcast the original packet, ‘Desktop1’. Once the originating system, ‘Desktop1’, receives the response then the Address Resolution Protocol (ARP) cache will hold the name resolution information.
How to Implement mDNS
Each system must be enabled to use mDNS on the network. The process is not a hard one to implement, but it does make the network easy to use when host-names are preferred.
A few things are needed to know before we start on a system:
- network adapter name
- system host-names
To find these is quite simple. The network adapter name is found by running the command ‘ifconfig’ in a Terminal. Find the active adapter and note its name. To find the host-name of a system you execute the command ‘hostname’ or ‘hostnamectl’ from a Terminal on a system.
Once you have the network apter name you are ready to enable mDNS. You need to start up the BeagleBone AI so that it can be accessed using mDNS.
Beaglebone AI
The Beaglebone AI Single Board Computer (SBC) is shown in Figure 1 and has the following hardware:
- Dual Arm® Cortex®-A15 microprocessor subsystem
- 2 C66x floating-point VLIW DSPs
- 2.5MB of on-chip L3 RAM
- 2x dual Arm® Cortex®-M4 co-processors
- 4x Embedded Vision Engines (EVEs)
- 2x dual-core Programmable Real-Time Unit and Industrial Communication SubSystem (PRU-ICSS)
- 2D-graphics accelerator (BB2D) subsystem
- Dual-core PowerVR® SGX544™ 3D GPU
- IVA-HD subsystem (4K @ 15fps encode and decode support for H.264, 1080p60 for others)
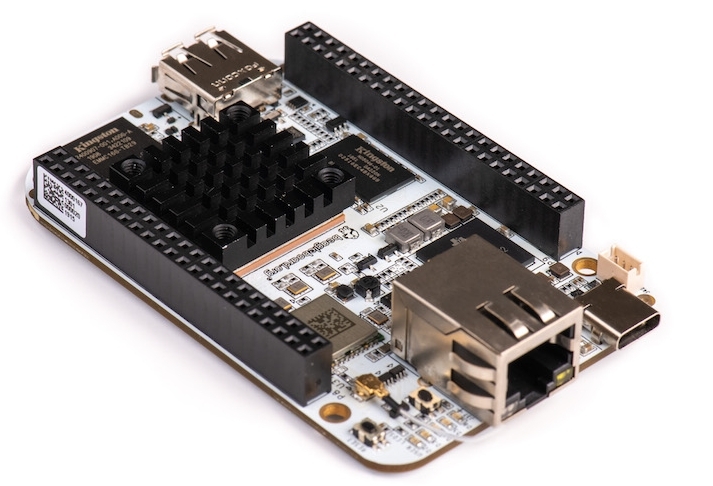
FIGURE 1
The software image is found at https://beagleboard.org/latest-images and can be burned to an SD card with Balena Etcher. To install and use Balena Etcher check out the article at https://linux.org/threads/iso-file-manipulation.23269/#post-68982.
After you download the image you do not need to extract it. Balena Etcher will manage the file just as it is after the download. Once the image is on the SD card can place it into the BeagleBone AI and plug the SBC into a USB-C cable for power. The SBC will power on and after a minute should be ready to start being used.
Enable mDNS
On a system, you can access the BeagleBone AI with a Secure SHell (SSH) program such as Remina. The SBC will need to be given the information to connect to your Wi-Fi network so other systems can find it (you could also connect it to the network via an Ethernet cable).
In your Wi-Fi connections, you need to look for a network called ‘BeagleBone-xxxx’ and connect to it.
NOTE: The value of ‘xxxx’ will vary board by board.
When you are prompted for a password, use ‘BeagleBone’. Once connected you can open a Web Browser and go to ‘http://192.168.8.1’. It may take a minute for the page to completely load. Once connected you should see a screen similar to Figure 2.
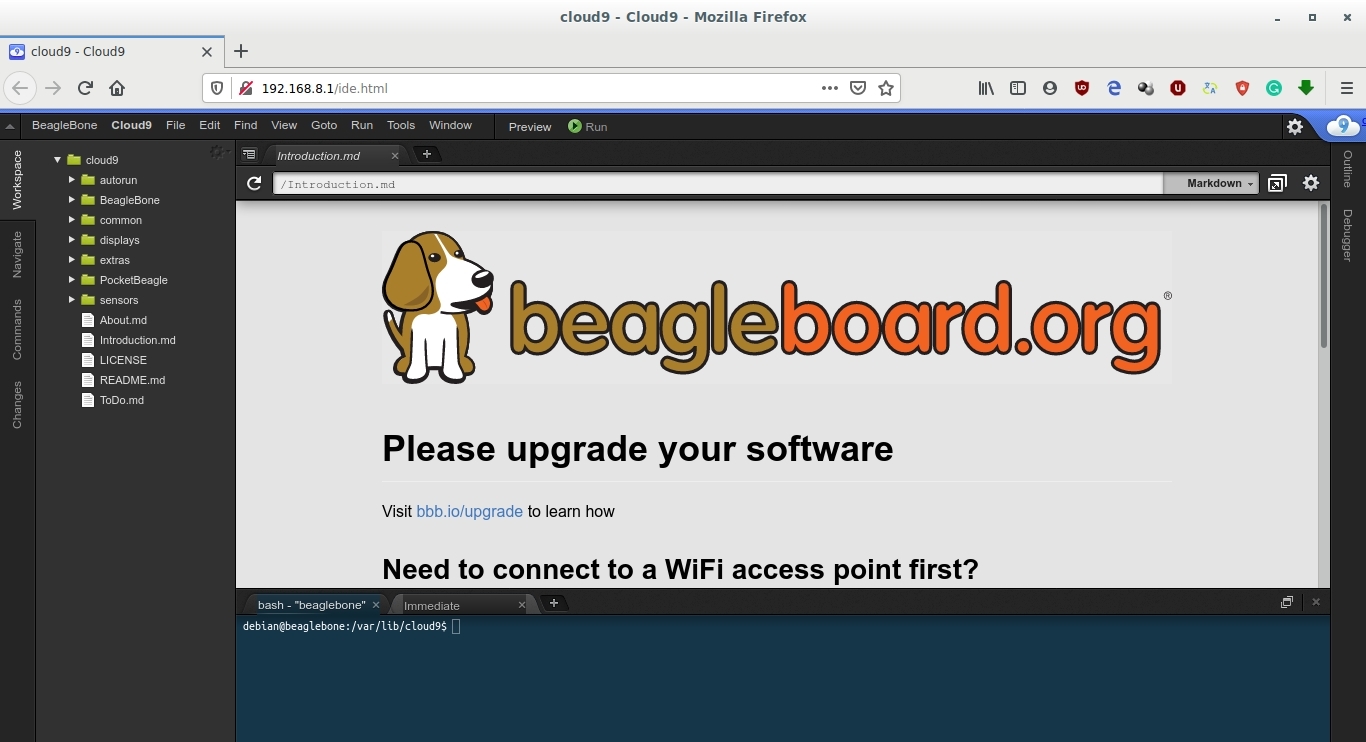
FIGURE 2
Put your mouse cursor over the picture on the screen and scroll down to show the instructions as shown in Figure 3.
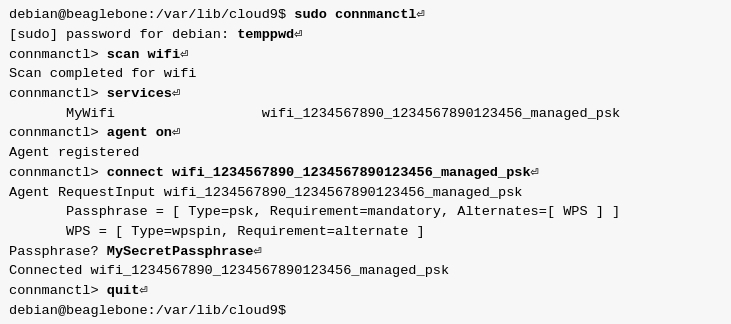
FIGURE 3
In the lower window which is a Terminal, you can type the commands shown and enable the Wi-Fi.
NOTE: The ‘MySecretPassphrase’ is the password for the Wi-Fi connection to the Router. After the first command, you will be prompted for the ‘[sudo] password for debian’ which is ‘temppwd’.
After some commands are entered you need to wait to get the response as shown in Figure 3.
Once the BeagleBone AI is connected to the Wi-Fi then you can reconnect to the normal Wi-Fi as well from the system you are using.
NOTE: You could use SSH to connect to the BeagleBone AI with the username ‘debian’ and a password of ‘temppwd’.
You can open a Terminal and type the command ‘ping beaglebone.local’ and you should not receive a response. Now we need to enable mDNS on your system so you can use the hostname of the BeagleBone AI to access it.
Enable mDNS
At this point, you do need to know the port name that you are using for your network interface. As I stated above you need to run ‘ifconfig’ and find the name. The name for my Wi-Fi adapter on my system is ‘wlo1’. Yours may be different.
You need to edit a file to enable the ability for mDNS. For example, I used ‘leafpad’ so the command to edit the necessary file is ‘sudo leafpad /etc/systemd/resolved.conf’.
Within the file is the line ‘#MulticastDNS=no’. The line should be changed to ‘MulticastDNS=yes’. Simply delete the hashtag (#) and change ‘no’ to ‘yes’. Save the files and exit your text editor.
At a command line in a Terminal execute the command ‘sudo systemctl restart systemd-networkd’. The command will restart the networking service.
You should now be able to ‘ping beaglebone.local’ and get a response. You can also open a browser and access the board with the address of ‘beaglebone.local’ as well.
The name resolution should work on all Linux systems on the network. Make sure you add ‘.local’ to the end of each hostname.
Troubleshooting
If there are issues with the name resolution then you need to check that ‘avahi-daemon’ is running. Use the command ‘sudo systemctl status avahi-daemon.service’ from a Terminal. It should show that the service is running. You should also see the hostname of the system you are executing the command as shown in Figure 4.
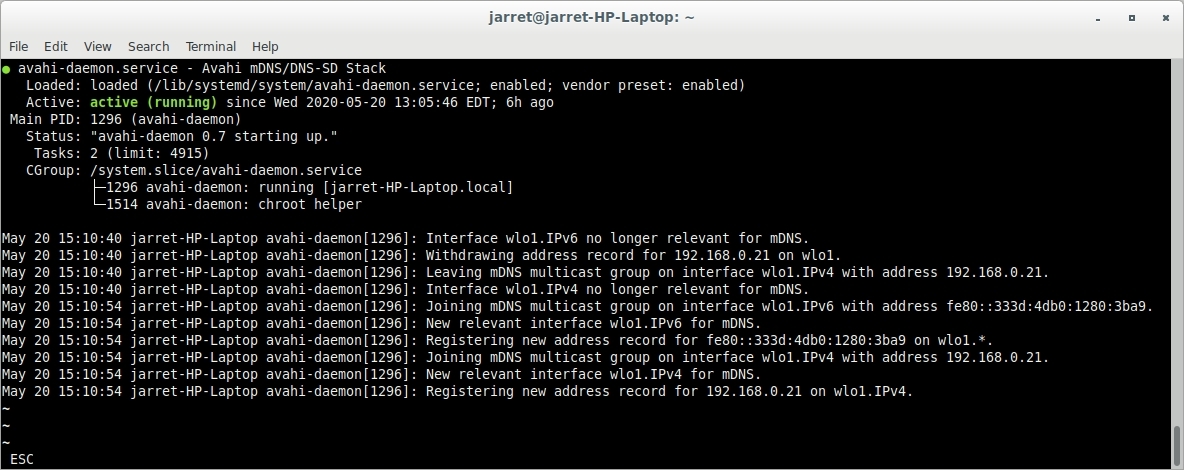
FIGURE 4
If the service is not started the try the command ‘sudo systemctl start avahi-daemon.service’. The service should start and all should be working.
I hope this article will aid you in some way. The Beaglebone AI board comes with mDNS already enabled.


